Have you ever had a song stuck in your head, but no words come to mind? You can hum the melody, but traditional apps like Shazam only work with actual audio matches through audio fingerprinting. Frustrating, right?
To address this common struggle, I created a Hum-to-Search music recognition app similar to Google’s hum feature. You can check it out here. This app can identify songs based solely on the melody you hum or sing, using vector search on audio embeddings in Astra DB. In this post, I'll share my learnings while building this app, and walk you through the technology behind it so you can create it yourself.
Digging into audio embeddings
To match hummed melodies to recorded audio, I had to standardize both audio forms into data that captured key features like pitch, timbre, and spatial characteristics. This was a perfect use case for audio embeddings.
Audio embeddings are numerical representations of important sound features. These embeddings are generally obtained by converting the audio signal into a visual spectrum of frequencies (spectrogram) and feeding it into a deep neural network that outputs a learned low-dimensional vector representation for that audio. With audio vector embeddings, we can use vector similarity search to find the closest match to a hummed audio embedding.
Initially, I tried pre-existing audio embedding models like panns_inference (PANNs = pre-trained audio neural networks) and OpenL3, but to my surprise, the results were mostly random with poor retrieval accuracy. It is likely that the models were not trained for this specific use case, instead matching songs on style; pop songs matched with other pop songs and ballads with similar ballads. This could be useful for a music recommendation system based on intrinsic music qualities, but not for exact song-matching to hummed audio.
MIDI to the rescue!
I continued to grapple with how to process audio and after more research, I found some success by standardizing all the audio into MIDI. MIDI, or Musical Instrument Digital Interface, is a digital audio recording of music, like ASCII is a bitmap image of a page of text. In MIDI, musical events are described with three integer values:
- the event type (such as "note on" or "note off")
- which key on a musical keyboard is pressed (with middle C assigned the number 60)
- The note loudness
This compact, data-driven format enables MIDI to convey detailed musical instructions without transmitting actual audio, much like ASCII represents text characters without visual representation. In this solution, we’ll use the midi keyboard notes as a method of generating vectors.
Building the application
To build this application, you will need to:
- Install Python 3.10.0. The packages we will use are stable on this Python version.
- Install Node.js
- Install ffmpeg - this is required for audio processing.
You will also need a free DataStax account to store your audio embeddings. If you don't already have one, sign up for a free Astra DB account here.
Data processing
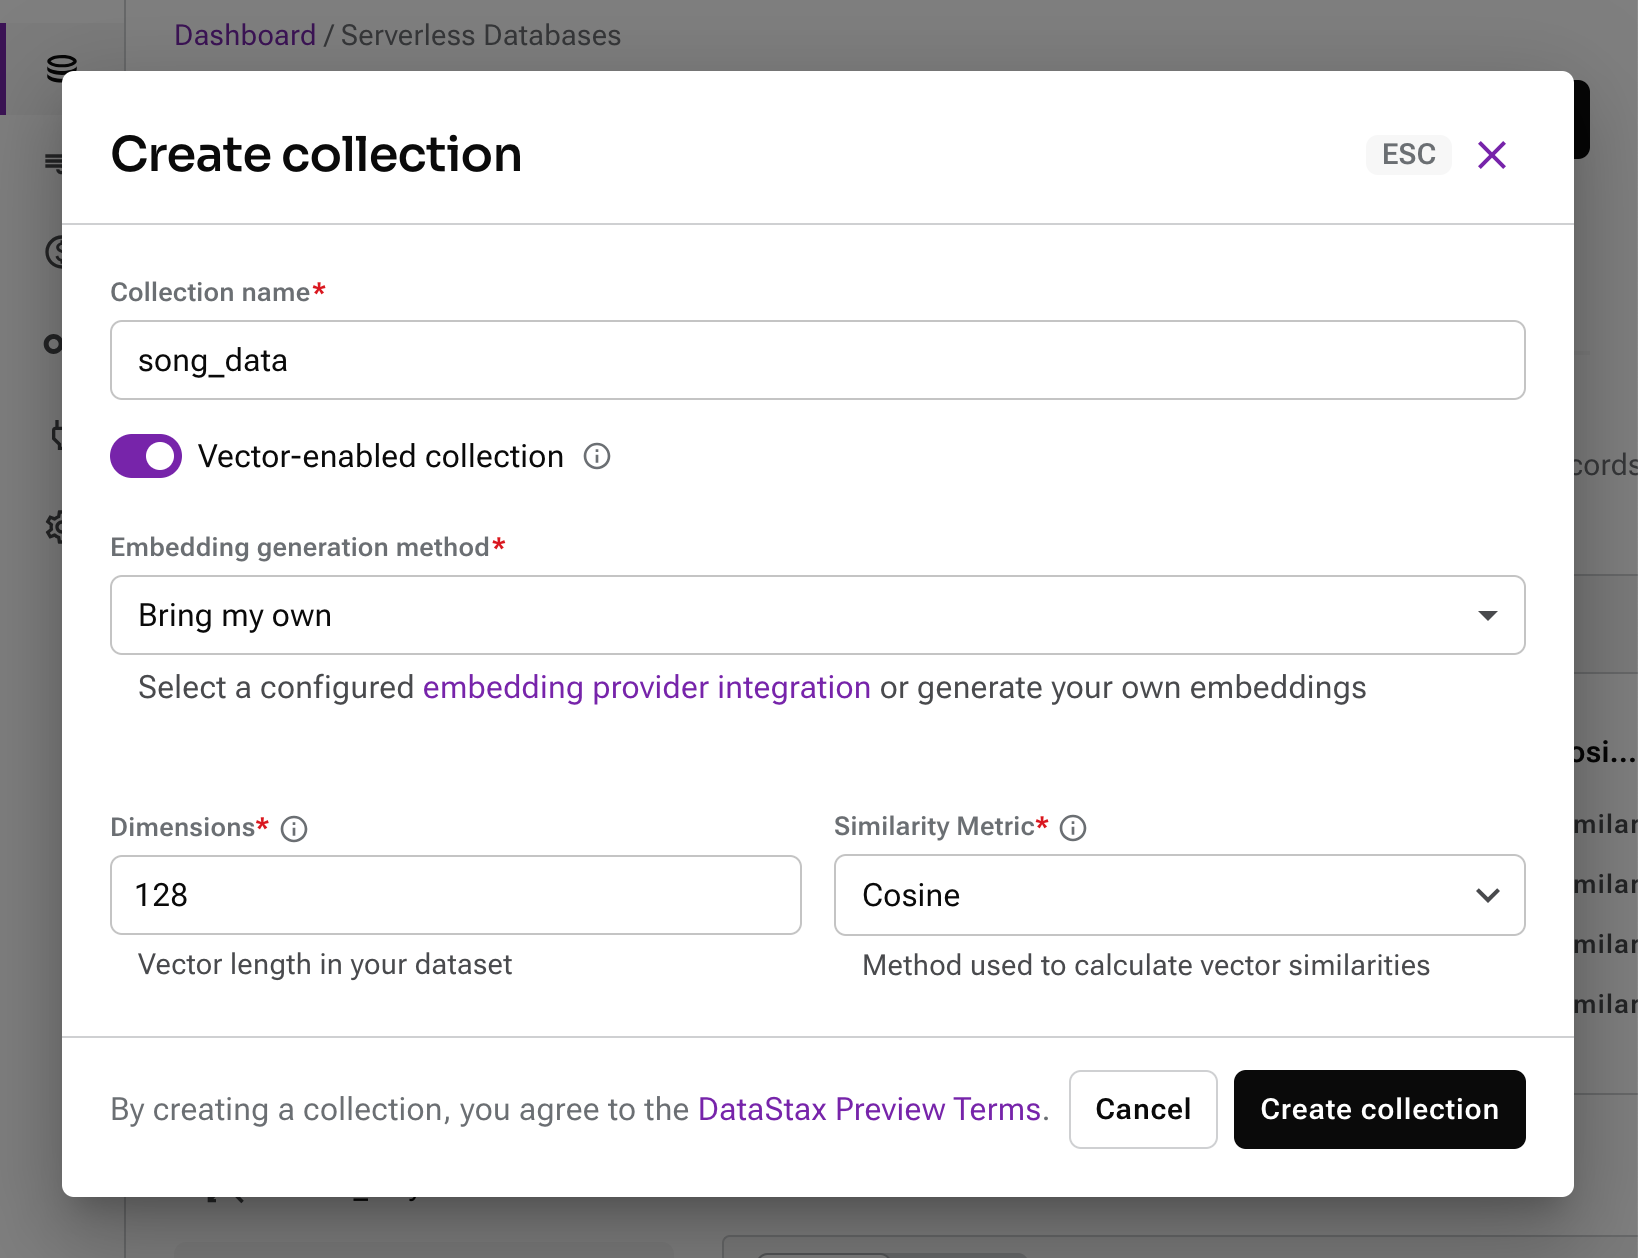
1) Log in to https://astra.datastax.com and create a serverless vector database in Astra DB.
2) Then create a vector-enabled collection following this reference:
3) Clone this GitHub repo and change into the /flask-api directory:
git clone https://github.com/sribala20/h2s.git
cd h2s/flask-api
4) Copy the .env-example file to create a .env file
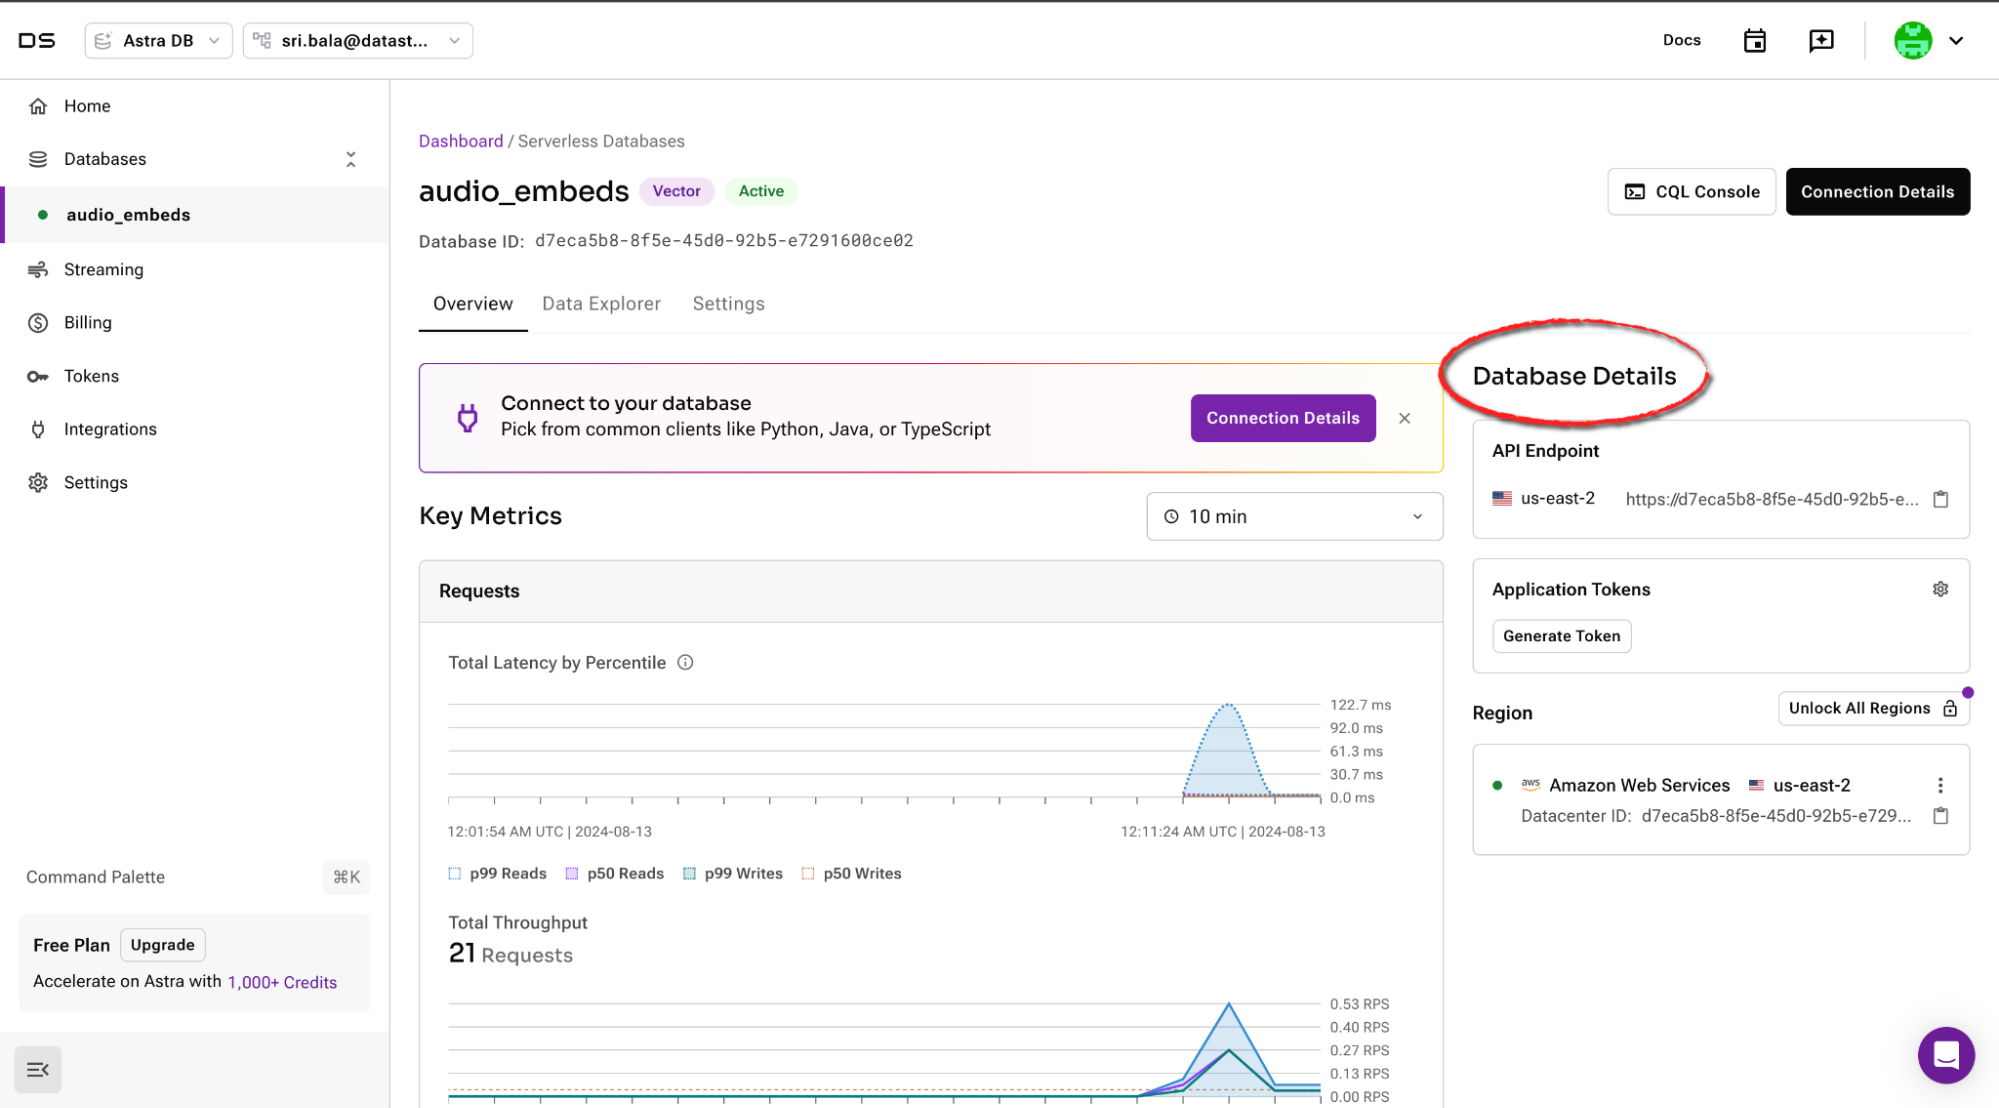
cp .env-example .envIn the DataStax dashboard, navigate to the Overview panel on your database, and under Database Details, copy the API endpoint URL and paste it into the .env file. Then generate an Application token and paste that into the .env file too.
5) Create a virtual environment for installing packages in the flask-api directory.
python3.10 -m venv venv
source venv/bin/activate
and then run pip install -r requirements.txt
6) Finally, run python3 loadData.py to load your data into Astra DB. 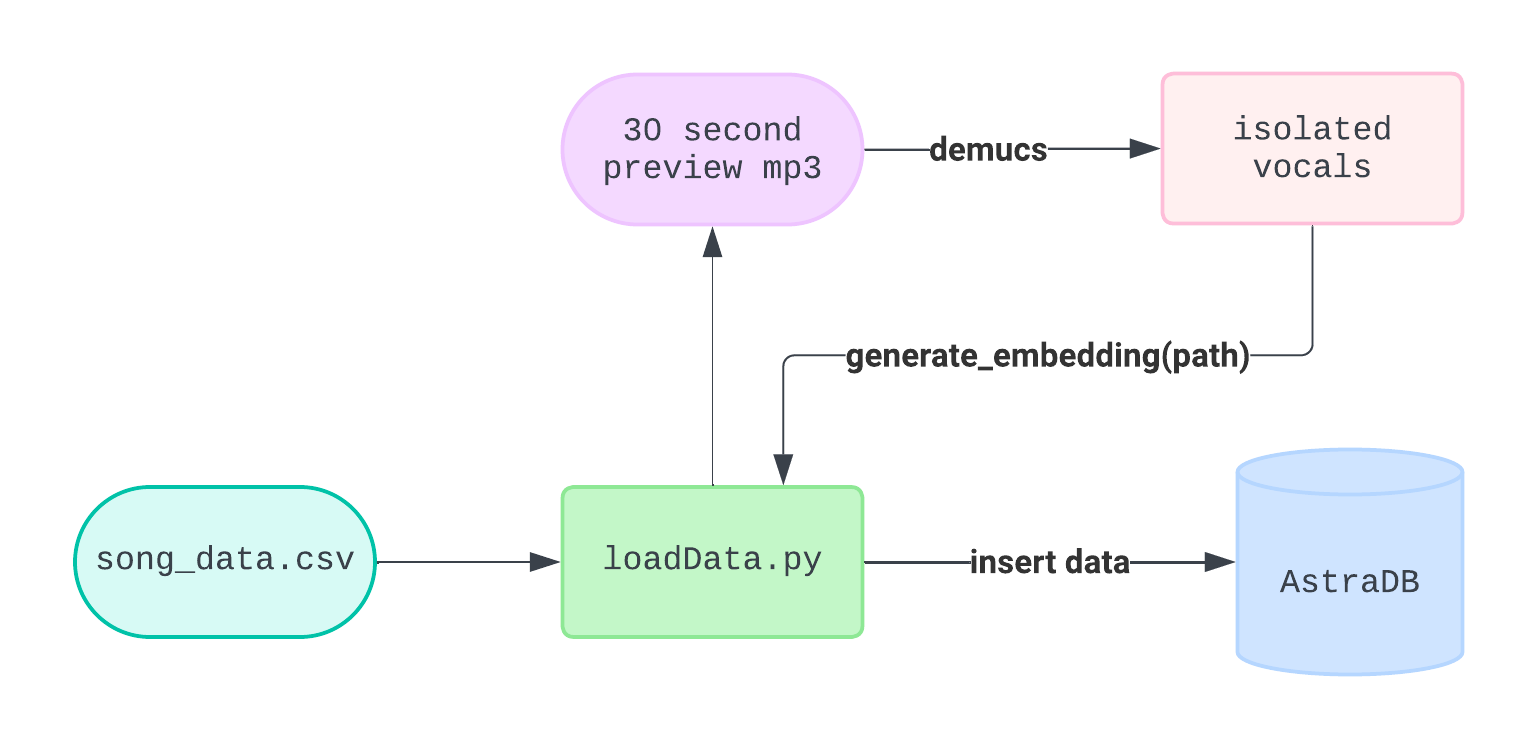
This script processes song_data.csv, a selection of tracks from a Kaggle database of top Spotify songs, to extract relevant data and generate embeddings. It retrieves the 30-second preview URLs of each track, isolates the vocals using the Demucs algorithm, and then creates an embedding from the vocals. Along with the embedding, the script inserts track information such as the track name, artist name, album, release date, album image, and the 30-second preview URL into the database. We will use this later to make our front end awesome.
Hum to search! Generating audio embeddings
Let’s walk through how we’re generating embeddings. This functionality lies in flask-api/getEmbeds.py. We use this process to generate embeddings for our song data, and our hummed/sung melodies.
We generate a MIDI translation with Spotify’s basic pitch, which uses a lightweight neural network to transcribe audio to MIDI. This function call generates a MIDI output of audio with the set parameters based on their demo settings.
def audio_to_midi(audio_path: str, midi_path: str):
   # Predict the notes using the basic pitch tensorflow model (onnx format)
   model_output, _, _ = predict(audio_path, ICASSP_2022_MODEL_PATH)
   # Convert model output to midi format
   midi, note_events = model_output_to_notes(
       output=model_output,
       onset_thresh=0.5,
       frame_thresh=0.3,
       infer_onsets=True,
       min_note_len=11,
       min_freq=1,
       max_freq=3500,
       include_pitch_bends=True,
       multiple_pitch_bends=False,
       melodia_trick=True,
       midi_tempo=120
   )
   return midi
Next, we extract the pitches from the MIDI data output. It's important to note that we aren’t implementing pitch correction, so users need to sing relatively on key for the app to achieve accurate recognition.
def get_pitch_vector(midi_data):
   pitch_vector = []
   for instrument in midi_data.instruments:
       for note in instrument.notes:
           pitch_vector.append(note.pitch)
   return pitch_vector
From the pitch data, we create a normalized note histogram showing how often different musical notes appear in a piece of music. This method is similar to counting word frequencies in text analysis. It outputs an array that acts as a vector representation of our audio.
# Function to normalize a vector - provides consistent scale between 0 and 1 for cosine comparisons
def normalize(v):
   norm = np.linalg.norm(v)
   return v / norm if norm != 0 else v
# Function to create a normalized note histogram from pitch data
def create_note_histogram(pitches):
   histogram, _ = np.histogram(pitches, bins=np.arange(0, 129))
   norm_histogram = normalize(histogram)
   return norm_histogram
Finally, we put together all the pieces in one function.
# Function to generate embedding from audio file
def generate_embedding(temp_audio_path):
   midi_data = audio_to_midi(temp_audio_path)
   pitches = get_pitch_vector(midi_data)
   vector_embedding = create_note_histogram(pitches)
   return vector_embedding
At this point, we can run test.py to copy the embedding onto your clipboard. Hit paste in the collection search and watch the similarity search do its magic.
The user interface
The frontend lies in the main directory /h2s. App.js is the main entry point of our React app, where the routing occurs and the main components are rendered. Our two routes are the home page with WebRecorder.js and the Results page Results.js. All the styling is in our App.css file.
Our backend api is server.py. This contains our main endpoints that the frontend will make requests to.
Our in-app Web Recorder is created using the getUserMedia web API to gain access to the user’s microphone for capturing audio. Once permission is granted, a MediaStream is set up. We initialize the MediaRecorder API to record audio from our device and process the recording into an audio blob when the stop button is pressed. To learn more about how to use these APIs, check out these resources. Next, we create a FormData object and append our audioBlob. Finally, we use fetch to format and send a POST request to the server with the recorded file.
When the POST request is received from the button click, the server saves the audio file to a temporary directory and processes it using the generate_embedding function. The resulting embedding is formatted into a string for collection searching. The server then finds the highest cosine similarity match using collection.find and sends the matching tracks’ data to the results page.
@app.route('/upload', methods=['POST'])
def upload():
   try:
       file = request.files['audioFile']
       temp_dir = '/tmp/h2s/flask-api/temp'

       # Ensure the file path exists
       if not os.path.exists(temp_dir):
           os.makedirs(temp_dir)

       temp_audio_path = os.path.join(temp_dir, file.filename)
       file.save(temp_audio_path) # Save the uploaded mp3 audio to the temp directory

       embedding = generate_embedding(temp_audio_path)
       emb_str = np.array2string(embedding, separator=',', formatter={'float_kind':lambda x: "%.5f" % x}).replace(' ', '')

       print("vector:", emb_str) # Debugging statement to see vector output

       # vector similarity search
       results = collection.find(
       sort={"$vector": embedding},
       limit=5)

       tracks = []
       for doc in results:
           tracks.append({
               'track': doc['track'],
               'artist': doc['artist'],
               'album': doc['album'],
               'album_image': doc['album_image'],
               'track_url': doc['track_url']
           })

       print("Matching result:", tracks)  # Debugging statement

       os.remove(temp_audio_path)

       response = jsonify({'tracks':tracks})
       response.headers.add('Access-Control-Allow-Origin', '*')

       return response
   except Exception as e:
           return jsonify({"error uploading audio": str(e)}), 500
To start the application:
- Navigate to
/flask-apitypeflask runin the command line. This will start our server locally. - Open up a new command line and in
/h2s, runnpm install. - Copy
.env-frontendto.envand add the backend URL of the flask application (printed when you start the server). - Type
npm startto start up the local development server.
After the app loads, grant permission to access your microphone. Click the microphone icon and start singing, humming, or playing a song from the dataset. When you're done, click the mic icon again to stop the recording and listen to your playback. Then, hit the search button to see your results.
Conclusion
Congratulations! We've built a successful Hum-to-Search application using vector search and Astra DB. I encourage you to check it out at https://hum-search.vercel.app/ .
To recap, we covered:
- Audio embeddings
- Loading data into Astra DB
- Creating embeddings with Spotify’s basic pitch and MIDI pitch data
- Building a UI with an in-app web recorder and sending requests to a Flask API
- Performing vector search on Astra DB to find closest similarities between hums and recorded audio
To take this project to the next level and improve performance on a larger dataset, I’d consider implementing pitch correction to handle variations in key, utilizing dynamic time warping (DTW) for better time alignment, and conducting extensive testing on MIDI outputs.
All the source code is on GitHub, so feel free to contribute or use it as a foundation for various projects. Now go on and create your own innovative multimodal AI applications!