


Temporal.io is an open-source microservice orchestration platform that assists in tracking workflows in your application development. It provides the user with a plug-and-play persistence layer that lets them choose and configure their Temporal Server with their preferred backend. Currently, Temporal is compatible with Postgres, MySQL, CockroachDB and Apache CassandraⓇ.
In Part 1 of our blog series on using Temporal.io with Astra DB, we showed you how Cassandra is the ideal choice as a backend database for apps that need scale. Aside from offering high performance and reliability, Cassandra’s architecture makes it possible to scale horizontally to handle very high loads. Since Astra DB simplifies cloud-native Cassandra application development, when you combine Temporal with Astra DB you get all the benefits of Cassandra with the flexibility of a multi-cloud, serverless database-as-a-service (DBaaS).
In this post, we’ll show you how to connect Temporal with Astra DB to easily manage workflows at scale. This runbook uses DataStax CQL-proxy, which is a sidecar designed to forward your application’s CQL traffic to an appropriate database service. Follow along on YouTube if you prefer!
Let’s get started!
Step 1. Astra DB prerequisites
Before connecting to Temporal, you need to first create an Astra database instance and gather all your credentials. If you haven’t already, you can sign up for a free Astra DB account that will give you 80 GB monthly to work with. To create an Astra account and easily spin up your first database, simply follow these instructions:
- Create an Astra database
- When asked for the keyspace name, name it
temporal. - Once your database is created, navigate back to your database dashboard and click Add Keyspace.
- Name this second keyspace
temporal_visibility - The status of your database will temporarily go to Maintenance but after a couple seconds you can refresh your screen and status should go back to Active.
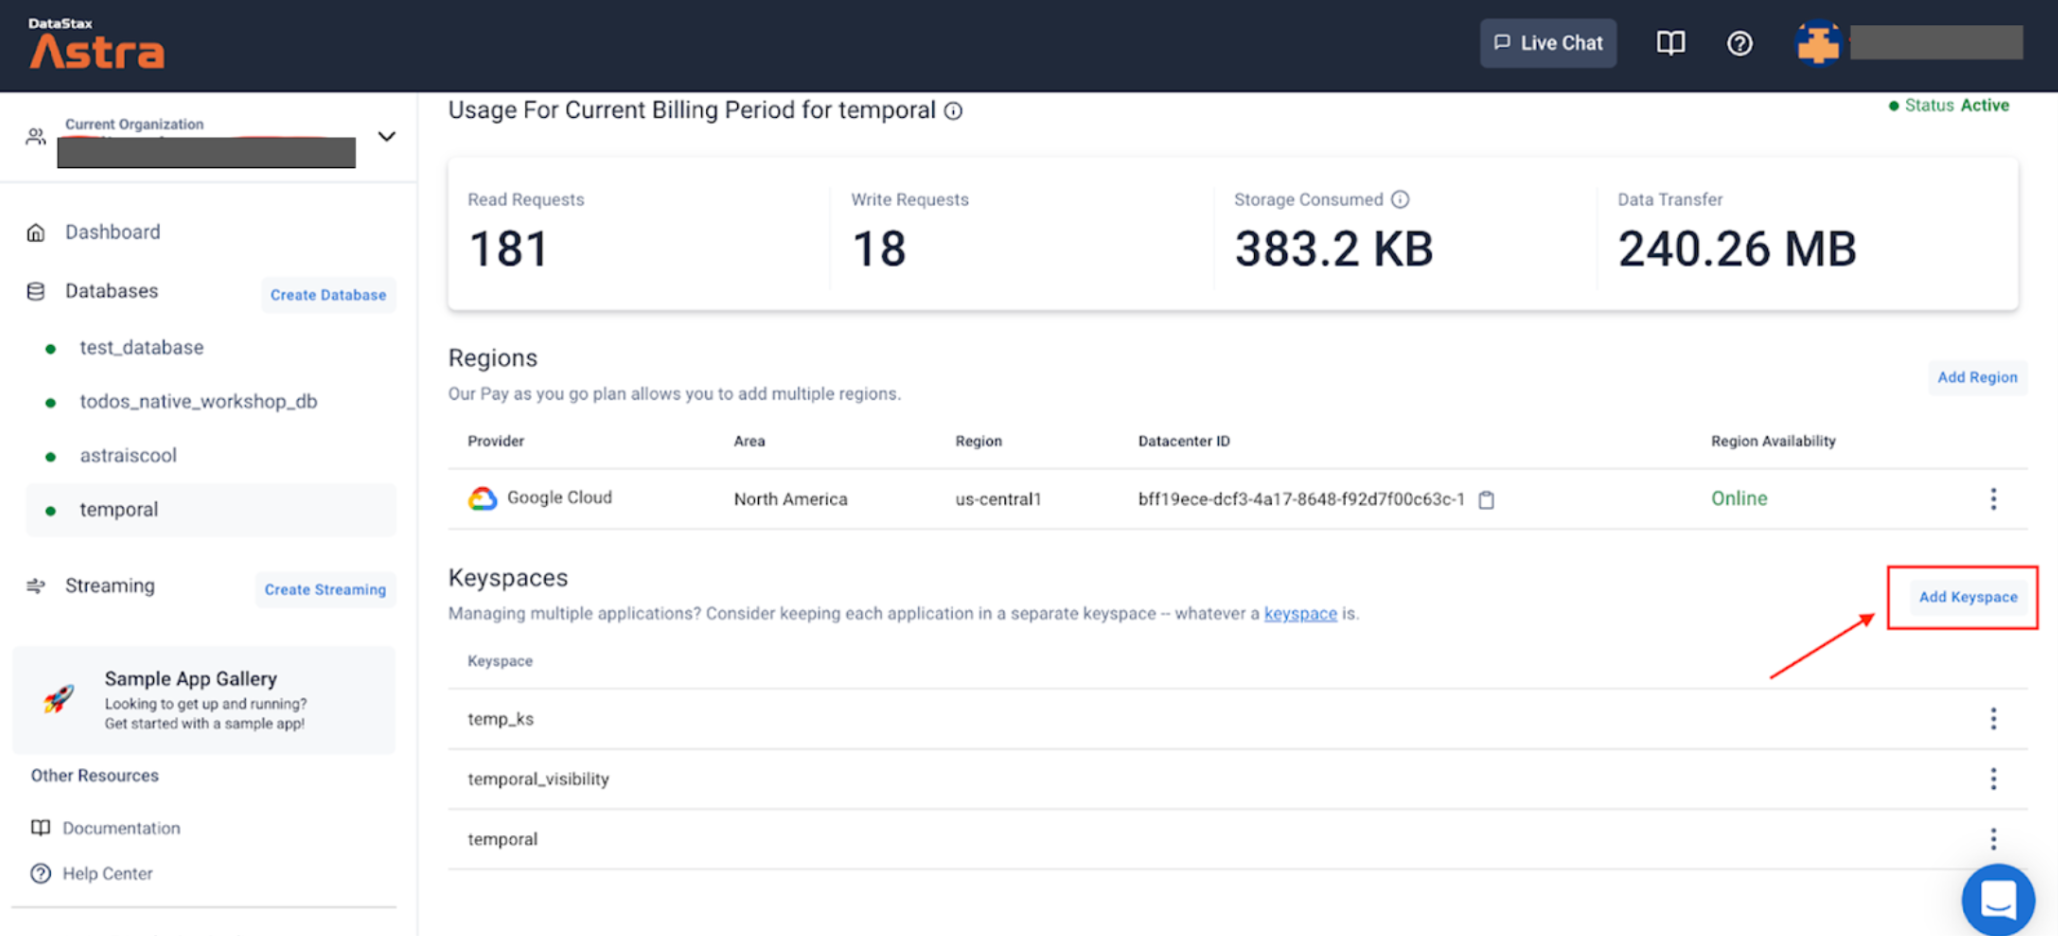
Figure 1. Screenshot of Astra DB dashboard and where to add the keyspaces.
Tokens are required to authenticate against Astra with APIs or Drivers. These tokens can be used with multiple databases and can be configured to have specific permissions. In this example, you will create a token with Admin Role. Temporal uses this token to receive credentials and permission to access your database in a similar way to how Cassandra has a “user” and “password”, which we’ll discuss in more detail in Step 4, where you will configure the Persistence Layer in Temporal.
- When you create your tokens, download the CSV file to keep these credentials.
- Find your Database ID
Lastly, you want to get your Database ID. You can find this in one of two ways:
- Navigate to your your database and get the last ID in the URL:
https://astra.datastax.com/org/.../database/xxxxxxxx-xxxx-xxxx-xxxx-xxxxxxxxxxxx - Copy and paste the “Datacenter ID” without the trailing
-1from the “Regions” section of your Astra Dashboard.
Step 2. Temporal pre-setup
- Clone this GitHub repository.
- Navigate to your cloned repository and using your preferred text editor (e.g. VisualStudio or Sublime), update the
.envfile with the Astra Token and Astra Database ID that you obtained above.
ASTRA_TOKEN=<your Astra token>
ASTRA_DATABASE_ID=<your DB ID>
Step 3. Temporal schema migration to Astra DB
In this step, you will create and set up the keyspaces you created earlier in Astra earlier with temporal-cassandra-tool. This tool is part of the Temporal repo and relies on the schema definition.
- Navigate to your cloned
temporal-astra-cql-proxydirectory. - Run the following commands to initialize the keyspaces that you created through Astra. Note that there are two sets of commands, one for
temporalkeyspace and one fortemporal_visibilitykeyspace.
docker-compose -f docker-compose-schema.yaml run temporal-admin-tools \
  -ep cql-proxy -k temporal setup-schema -v 0.0
docker-compose -f docker-compose-schema.yaml run temporal-admin-tools \
  -ep cql-proxy -k temporal update-schema -d schema/cassandra/temporal/versioned/
Once the process is complete, you should see a message similar to this:
2022-03-02T22:23:27.618Z INFO Validating connection to cassandra cluster. {"logging-call-at": "cqlclient.go:112"}

2022-03-02T22:42:53.526Z INFO Connection validation succeeded. {"logging-call-at": "cqlclient.go:118"}
2022-03-02T22:42:53.526Z INFO Starting schema setup {"config": {"SchemaFilePath":"","InitialVersion":"0.0","Overwrite":false,"DisableVersioning":false}, "logging-call-at": "setuptask.go:57"}
2022-03-02T22:42:53.526Z DEBUG Setting up version tables {"logging-call-at": "setuptask.go:67"}
2022-03-02T22:42:54.120Z DEBUG Current database schema version 1.6 is greater than initial schema version 0.0. Skip version upgrade {"logging-call-at": "setuptask.go:116"}
2022-03-02T22:42:54.120Z INFO Schema setup complete {"logging-call-at": "setuptask.go:131"}
Great! Your schemas have been migrated with Astra DB. You can double-check to make sure the correct tables have been created by querying your database in Astra DB’s CQL Console.
- If you do a quick
DESCRIBE tables; in both yourtemporalandtemporal_visibilitykeyspaces, you should see there are tables loaded in that were created by the schema migration.
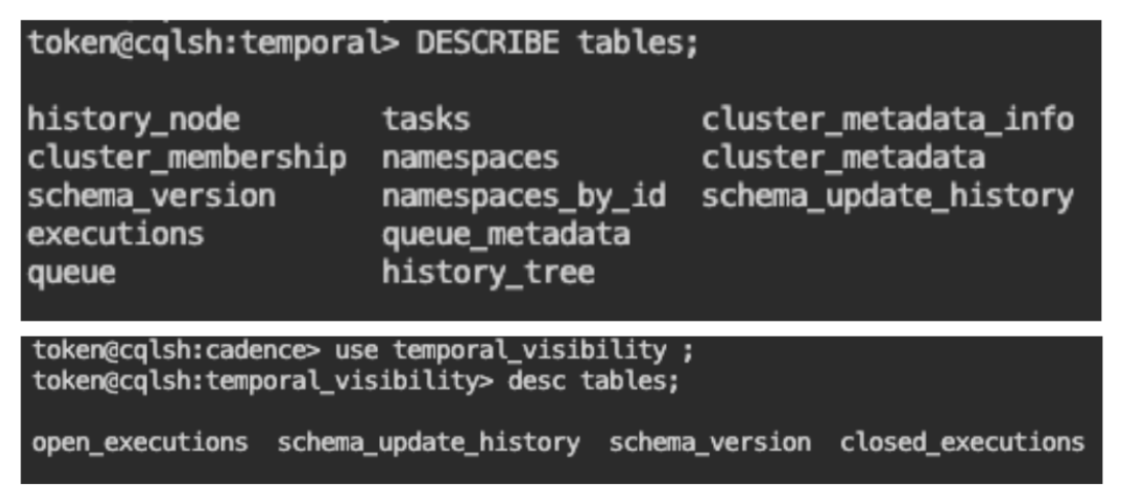
Figure 2. Verifying the tables were created after migrating your schemas with Astra DB.
Step 4. Run Docker Compose
In this step, the docker-compose.yaml file is already provided for you in the temporal-astra-cql-proxy repo. This file creates different docker containers to run Temporal server. The persistence layer is configured for you to connect with cql-proxy, and it should pull the Astra credentials you set earlier.
services:
 cql-proxy:
   container_name: cqlproxy
   image: datastax/cql-proxy:v${CQL_PROXY_VERSION}
   ...
   environment:
     - ASTRA_TOKEN=${ASTRA_TOKEN}
     - ASTRA_DATABASE_ID=${ASTRA_DATABASE_ID}
     - HEALTH_CHECK=true
Now you can run the docker-compose command to start up Temporal.
docker-compose up
Step 5. Test and validate
You can test your connection and even run some sample Temporal projects. Using Temporal’s Command Line tool, tctl, you can interact with your local Temporal server.
- Create an alias for
tctl:
% alias tctl="docker exec temporal-admin-tools tctl"
2. The following is an example of how to register a new namespace dedicated to certain workflows: test with one day of retention, -rd 1.
% tctl --ns test namespace register -rd 1
% Namespace test successfully registered.
3. Make sure to use tctl when using the sample apps. Also, keep in mind that you want to modify the starter and worker code so that it points to this specific Temporal deployment. For example:
c, err := client.NewClient(client.Options{HostPort: "127.0.0.1:7233", Namespace: "test"})
Once you have this all running, you should be able to see your workflows reflect on both the Temporal UI and Astra UI (Figure 2).
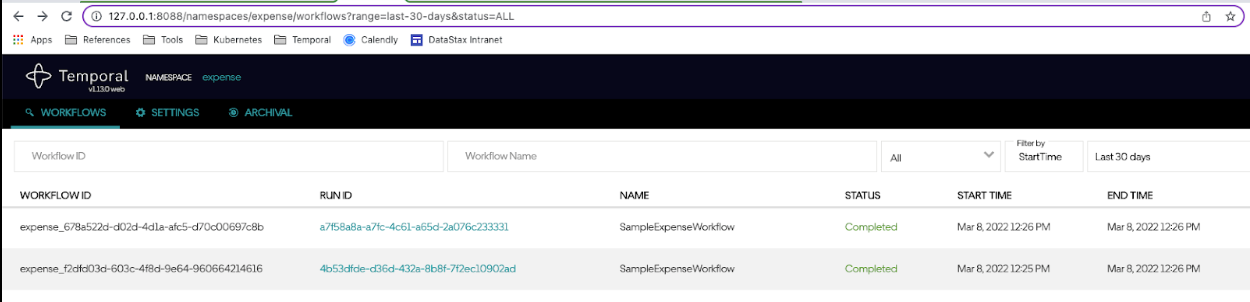
Figure 3. Verifying that your workflows show up on both the Temporal UI and Astra UI.
Summing up
There you have it! With this short post and your free Astra DB account, you’ve just seen how easy it can be to connect Temporal to Astra with all the power of Apache Cassandra and none of the operational complexity.
So, if you need a microservice orchestration platform backed by a world-class database for high-volume workflows, but don’t have the time to manage it all yourself, give Astra DB and Temporal a try.
Subscribe to the DataStax Tech Blog for more developer stories like this! Also check out our DataStaxDevs YouTube channel for free tutorials and follow DataStax Developers on Twitter for the latest news about our developer community.
This post was originally published on the DataStax Blog.
Resources
- Part 1: Easily Manage Workflows at Scale with Temporal.io and Astra DB
- Part 3: How to Connect Temporal.io to Astra DB with Kubernetes
- DataStax Astra DB | Cloud-Native Cassandra-as-a-Service
- Use Temporal.io on Astra using cql-proxy
- GitHub: Temporal samples
- GitHub: A client-side CQL proxy/sidecar
- GitHub: Create an Astra DB instance
- GitHub: Create an Astra DB Token