
Streamline your development configuration using Docker with DataStax Enterprise.
Prerequisites
- Install Docker for Desktop
Docker has great tutorials for beginners as well as advanced users. We're assuming some basic Docker knowledge in this tutorial but the basics are worth reviewing. In her own words:
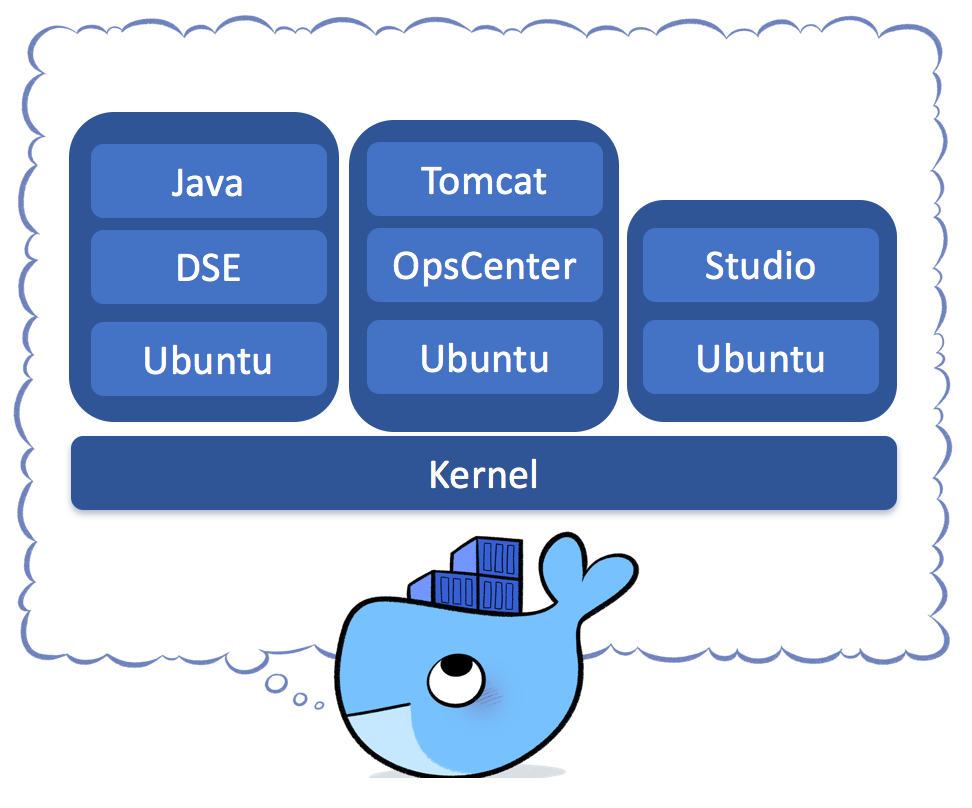
A container image is a lightweight, stand-alone, executable package of a piece of software that includes everything needed to run it: code, runtime, system tools, system libraries, settings. Available for both Linux and Windows based apps, containerized software will always run the same, regardless of the environment. Containers isolate software from its surroundings, for example differences between development and staging environments and help reduce conflicts between teams running different software on the same infrastructure.
Docker Command Line Basics
Make sure Docker is running. Open a terminal window and see what commands are available. If this errors then you need to start the docker daemon.
docker
List images which have been pulled
docker images
If you see a bunch of our competitors listed you can easily remove them with (this is a joke. kind of):
docker rmi %image_id%
Now we need to get the DataStax Images!
What is Available
Use DataStax provided Docker images in non-production environments for development, to learn DataStax Enterprise, OpsCenter and DataStax Studio, to try new ideas, or to test and demonstrate an application. The following images are available:
Docker Hub:
- DataStax Enterprise: The best distribution of Apache Cassandra™ with integrated Search, Analytics, Graph, and Advanced Security.
- DataStax Studio: An interactive developer’s tool for DataStax Enterprise which is designed to help your DSE database, Cassandra Query Language (CQL), DSE Graph, and Gremlin Query Language development.
- DataStax Enterprise OpsCenter: The web-based visual management and monitoring solution for DataStax Enterprise (DSE)
Get the Images
DataStax DataStax Enterprise, Studio and Opscenter are in Docker hub so getting them is straight forward.
Pull DataStax Enterprise, Studio, and OpsCenter
docker pull datastax/dse-server
docker pull datastax/dse-studio
docker pull datastax/dse-opscenter
Running the Containers
| Option | Description |
|---|---|
>-e |
(Required) DS_LICENSE=accept Sets Environment variables to accept the licensing agreement and (optional) change the initial configuration. |
-d |
(Recommended) Starts the container in the background. |
-p |
Publish container ports on the host computer to allow remote access to DSE, OpsCenter, and Studio. See Exposing DSE public ports |
-v |
Bind mount a directory on the local host to a DSE Volume to manage configuration or preserve data. See Volumes and data. |
--name |
Assigns a name to the container. |
These are the most commonly used docker run switches used in deploying DSE. For a full list please see docker runreference.
Enabling advanced functionality
By default, the DSE server image is set up as a transactional (database) node. To set up the node with DSE advanced functionality, add the option that enables feature to the end of the docker run command.
DSE start switches Description -s Enables and starts DSE Search. -k Enables and starts Analytics. -g Enables and starts a DSE Graph.
| DSE start switches | Description |
|---|---|
| -s | Enables and starts DSE Search. |
| -k | Enables and starts Analytics. |
| -g | Enables and starts a DSE Graph. |
You can combine the options to run more than one feature. For more examples, see the Starting DSE documentation.
Let's start a single node of DSE
docker run -e DS_LICENSE=accept --name my-dse -d datastax/dse-server
We started this container in the background by using the -d option. Use the following command to get an interactive shell to your DSE node.
docker exec -it my-dse bash
If you're sitting down and totally ready to be amazed. Move on to the next step and get yourself a cql shell :
cqlsh
Easy right? Okay, we have more to learn. Exit that shell. We'll come back to it.
exit
exit
Let's take a quick look at the docker logs just so you know how:
docker logs my-dse
Cool right? But lets say that you just want to see the output of a common status command without getting that interactive shell. It's easy:
docker exec -it my-dse nodetool status
Lets stop our running container. You don't have to stop the running container but we're starting with a clean slate is the easiest way to learn as is repetition. as is repetition. as is repetition. :
docker stop my-dse
docker rm /my-dse
Creating an OpsCenter container
Next we'll create an OpsCenter container. OpsCenter exists to manage DSE, so we'll need a dse-server node also.
Create an OpsCenter container:
docker run -e DS_LICENSE=accept --name my-opscenter -d -p 8888:8888 datastax/dse-opscenter
Create DataStax Enterprise server nodes, providing the link to the OpsCenter container using the Docker name.
docker run -e DS_LICENSE=accept --link my-opscenter:opscenter --name my-dse -d datastax/dse-server
Get the IP Address of your your new DSE node.
docker inspect my-dse | grep '"IPAddress":'
Open a browser and point to http://DOCKER_HOST_IP:8888. The Create the new connection dialog displays.
- Click Manage existing cluster.
- Enter the IP Address for the DSE Node (from previous step)
- Choose Install agents manually.
The agent is already available on the DSE node, no installation is required.
See OpsCenter documentation for further info on usage/configuration. Note that LCM is not supported and should not be used for containerized environments. Other tasks like scheduling commitlog backups would require writing a file in DSE which isn't possible in immutable containers. These tasks much be handled manually using DSE configuration files.
Creating a Studio container
1. Create a Studio container:
docker run -e DS_LICENSE=accept --link my-dse --name my-studio -p 9091:9091 -d datastax/dse-studio
2. Open your browser and point to http://DOCKER_HOST_IP:9091, create the new connection using my-dse as the hostname.
Check Studio documentation for further instructions.
##Docker Compose - Building a Simple Cluster
Okay. Lets keep going. We need a cluster.
Fun fact. Until the 'thing' is running it's an image. When running it's a container. Stale conversation at a party? Might I suggest this opener "Isn't it interesting that you don't actually call something a 'container' until it's running. Up to that point it's just an image.
Okay back to work.
Bootstrapping a multi-node cluster with OpsCenter and Studio can be elegantly automated with Docker Compose. To get sample compose.yml files visit the following links.
3-Node Setup
docker-compose up -d --scale node=2]
3-Node Setup with OpsCenter
docker-compose -f docker-compose.yml -f docker-compose.opscenter.yml up -d --scale node=2
3-Node Setup with OpsCenter and Studio
docker-compose -f docker-compose.yml -f docker-compose.opscenter.yml -f docker-compose.studio.yml up -d --scale node=2
Single Node Setup with Studio
docker-compose -f docker-compose.yml -f docker-compose.studio.yml up -d --scale node=0
Custom Configuration Folder
For simple use cases we’ve exposed common settings as environment variables. For advanced configuration management we’re providing a simple mechanism to let you change or modify configurations without replacing or customizing the containers. You can add any of the approved config files to a mounted host volume and we’ll handle the hard work of mapping them within the container. In this section we're giving that a try.
DataStax provided Docker images include a start up script that swaps DSE configuration files found in the Volume /config with the configuration file in the default location on the container.
The full list of configuration files can be found at the following links:
On our local machine let's create a directory
mkdir my-dse-config
my-dse-config
Start a DSE-Server image
docker run -e DS_LICENSE=accept --name my-dse -d datastax/dse-server
Now we need to copy down a file that we want to customize.
docker cp my-dse:/opt/dse/resources/cassandra/conf/cassandra.yaml my-dse-config/cassandra.yaml
Now we need to change a value in the cassandra.yaml file. We'll change disk optimization from ssd to spinning. Something we'd never hope to need to change but a good and simple example.
cat my-dse-config/cassandra.yaml |grep disk_opti
You see that it's currently set to ssd. You can use any editor to change the value to 'spinning' or if you're on a mac use the following sed command:
sed -i.bu 's/: ssd/: spinning/g' my-dse-config/cassandra.yaml

cat my-dse-config/cassandra.yaml | grep disk_opti
Now lets mount the config directory which holds are changed cassandra.yaml back into the container
Adding a host volume is part of the docker run command so we need to stop and remove the running container.
docker stop my-dse

docker rm my-dse
Next we need to run the image with the mount option. Note that the format is localDir:containerDir. Also, it requires an absolute path. On my mac it's something like /users/kathryn/my-dse-config but I've simplified for the tutorial
docker run -e DS_LICENSE=accept --name my-dse -d -v /my-dse-config/:/config datastax/dse-server
Lastly, lets verify our customized cassandra.yaml is being used.
docker exec -it my-dse cat /opt/dse/resources/cassandra/conf/cassandra.yaml |grep spinning
Remember, you can now put any number of the approved config files in this same directory.
Next you should
- Try a more advanced tutorial from DataStax Academy
Cassandra Docker Cheat Sheet
Common commands used when working with Cassandra and Docker:
========= Status =========

#Active containers $> docker ps

#Container Utilization $> docker stats

#Container Details $> docker inspect my-dse

#NodeTool Status $> docker exec -it my-dse nodetool status

========== Logs ==========

#Server Logs $> docker logs my-dse

#System Out $> docker exec -it my-dse cat /var/log/cassandra/system.log

#Studio Logs $> docker logs my-studio

==== Start/Stop/Remove ==== #Start Container $> docker start my-dse

#Stop Container $> docker stop my-dse

#Remove Container $> docker remove my-dse

#Contaier IPAddress &> docker inspect my-dse | grep IPAddress

#CQL (Requires IPAddress from above) $> docker exec -it my-dse cqlsh [IPAddress]

#Bash $> docker exec -it my-dse bash