Can I Ask You a Question? Building a Taylor Swift Chatbot with the Astra DB Vector Database

TL;DR - Want answers about Taylor Swift? Ask SwiftieGPT, a chatbot built on DataStax Astra DB and powered by conversational AI. And read on for a deep-dive into how we built this app.
What do you get a person who has everything for their birthday? As all of her friends and family (and most of her fans) know, Taylor Swift turns 34 today. Yup, she was born on December 13th, 1989, in West Reading, PA. Here at DataStax, we have a veritable army of Swifties, and the topic came up of how people were planning on celebrating her birthday. Out of the chatter, someone mentioned the idea of building a super helpful, all-knowing chatbot that could answer any and all questions about our favorite artist.
This idea quickly evolved into SwiftieGPT, a GenAI take on the beloved fansite. Think MySpace, but brought into 2023, built on a modern JavaScript stack and powered by conversational AI. We built this using the following tools: Next.js, LangChain.js, Cohere, OpenAI, and DataStax Astra DB. It’s deployed to Vercel and you can check it out live at: https://www.tswift.ai.
The SwiftieGPT source code is available on Github; read on for a deep dive into how we built it. A very happy birthday to Taylor Swift and we hope that Swifties around the world get a kick out of SwiftieGPT!
Architecture
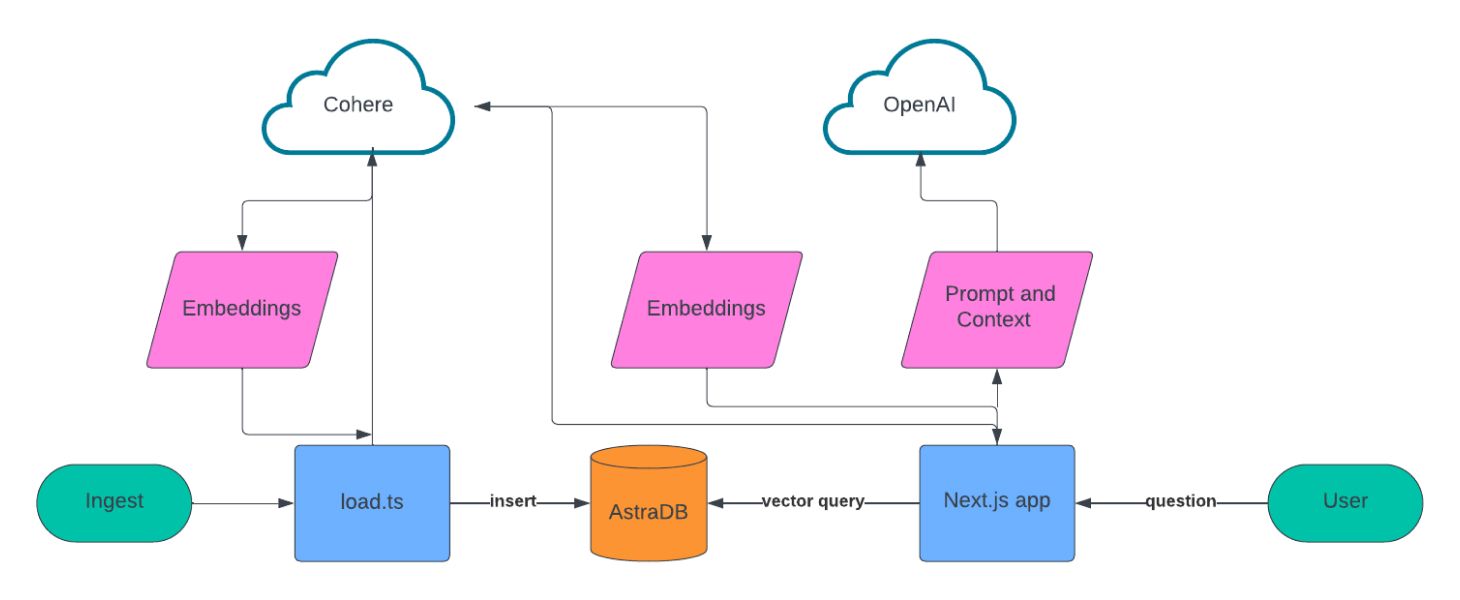
We chose to design this app in two parts: a data ingest script that creates the knowledge base and a web app that provides the conversational experience.

For data ingest, we built a list of sources to scrape, used LangChain to chunk the text data, used Cohere to create the embeddings, and then stored all of this in Astra DB.
For the conversational UX, we are building on Next.js, Vercel’s ai library, Cohere, and OpenAI. When a user asks a question, we use Cohere to create the embeddings for that question, query Astra DB using vector search, and then feed those results into OpenAI to create the conversational response to the user.
Setup
To build this application yourself or get our repo and get up and running, you’ll need a few things:
- A free Astra DB account
- A free Cohere account
- An OpenAI account
After you’ve signed-up for Astra DB, you’ll need to create a new vector database. Go ahead and log in to your account. If you see a prompt to enable the new Vector experience, go ahead and do it, it will help you better manage your vector databases. Next, create a new serverless vector database.
While you’re waiting for the database to provision, create a new .env file at the root of your project. You’ll use this to store secret credentials and config information for the APIs that we’ll be using to build this app. Entries in .env should look like this:
KEY=value
Once your database has been created, create a new application token and store that value in your .env file with the ASTRA_DB_APPLICATION_TOKEN key. Next, copy your API endpoint and save it as ASTRA_DB_ID. Finally, we’ll need to store our information in a collection, so set ASTRA_DB_COLLECTION to swiftiepedia.
After you’ve signed up for Cohere, log in and go to API keys. You’ll find a trial API key that you can use for development, go ahead and copy that file and store it in .env as COHERE_API_KEY.
Finally, sign-in to your OpenAI account and create a new API key. Store that API key in your .env as OPENAI_API_KEY. Ok, that’s it, now time to write some code!
Ingesting the data
The process of ingesting and preparing our data involves four steps: scraping relevant websites, chunking the content, computing the embeddings, and storing the data in Astra DB. The script is located at /scripts/loadDb.ts—let’s dig into what it’s doing.
import { AstraDB } from "@datastax/astra-db-ts";
import { PuppeteerWebBaseLoader } from "langchain/document_loaders/web/puppeteer";
import { RecursiveCharacterTextSplitter } from "langchain/text_splitter";
import 'dotenv/config'
import { CohereClient } from "cohere-ai";
import { SimilarityMetric } from "../app/hooks/useConfiguration";
For the first two steps of our script (scraping and chunking), we are using LangChain, a framework for building applications powered by language models. It comes fully loaded with utilities for handling many common retrieval augmented generation (RAG) tasks, and in our case we are using both the PuppeteerWebBaseLoader and RecursiveCharacterTextSplitter modules. We’ll see them in action later.
const { COHERE_API_KEY } = process.env;

const cohere = new CohereClient({
  token: COHERE_API_KEY,
});

const { ASTRA_DB_APPLICATION_TOKEN, ASTRA_DB_ID } = process.env;

const astraDb = new AstraDB(ASTRA_DB_APPLICATION_TOKEN, ASTRA_DB_ID);

const splitter = new RecursiveCharacterTextSplitter({
  chunkSize: 1000,
  chunkOverlap: 200,
});
Here we’re initializing the Cohere and Astra DB clients using the credentials and config in our .env file. Next, we initialize the LangChain text chunking module where we specify chunk sizes of 1,000 characters and an overlap of 200 characters.You might be wondering: what’s the overlap for? Well, imagine you took some text and split it into 100 pieces and jumbled them up.
Could you put them back together again? Probably not. But, if you split it into 100+ pieces, with 20% overlap, you’d have a much easier time putting them back together because you could see that certain chunks were located “near” other chunks. Doing something like this in the context of LLMs helps improve the relevance of answers in a similar way.
const createCollection = async (similarityMetric: SimilarityMetric = 'dot_product') => {
  const res = await astraDb.createCollection(ASTRA_DB_COLLECTION, {
    vector: {
      size: 384,
      function: similarityMetric,
    }
  });
};
This function creates the collection in Astra DB that will store our text and vector information. When we call createCollection we specify that we’re storing 384 dimensional vectors because that is what Cohere’s API provides and that we’re going to use the dot product similarity algorithm.
const scrapePage = async (url: string) => {
  const loader = new PuppeteerWebBaseLoader(url, {
    launchOptions: {
      headless: "new"
    },
    gotoOptions: {
      waitUntil: "domcontentloaded",
    },
    evaluate: async (page, browser) => {
      const result = await page.evaluate(() => document.body.innerHTML);
      await browser.close();
      return result;
    },
  });
  return (await loader.scrape())?.replace(/<[^>]*>?/gm, '');
};
The next step is to set-up a scraper using LangChain’s `PuppeteerWebBaseLoader`. This function will accept a URL, fetch the HTML content, load it into a headless browser and return the content of the webpage. This content is then stripped of HTML tags and returned as raw text.
const loadSampleData = async (similarityMetric: SimilarityMetric = 'dot_product') => {
  const collection = await astraDb.collection(ASTRA_DB_COLLECTION);
  for await (const url of taylorData) {
    console.log(`Processing url ${url}`);
    const content = await scrapePage(url);
    const chunks = await splitter.splitText(content);
    let i = 0;
    for await (const chunk of chunks) {
      const embedded = await cohere.embed({
        texts: [chunk],
        model: "embed-english-light-v3.0",
        inputType: "search_document",
      });

      const res = await collection.insertOne({
        $vector: embedded[0]?.embedding,
        text: chunk
      });
      console.log(res)
      i++;
    }
  }
};
Now that our DB is set-up and we have the ability to scrape web pages, we can start loading it with data. The loadSampleData function loops through an array of public URLs that we’ve configured that contain information about Taylor Swift, including information about her music, career, and tour dates. One by one those URLs are scraped and converted into chunks using LangChain’s RecursiveCharacterTextSplitter.
Those chunks are then fed into Cohere’s API using their embed-english-light-v3.0 model and the embeddings and text chunks are then stored in the Astra DB collection.
Building the chatbot user experience
Now that we’ve built up a knowledge base of all things Taylor Swift, it’s time to build the chatbot! For this application, we chose to use Next.js, a full-stack React.js web framework. The two most important components of this web application are the web-based chat interface and the service that retrieves answers to a user’s question.
The chat interface is powered by Vercel’s ai npm library. This module helps developers build ChatGPT-like experiences with just a few lines of code. In our application, we’ve implemented this experience in the app/page.tsx file, which represents the root of the web application. You can review the entire file, but here are a few code snippets worth calling out:
"use client";
import { useChat } from 'ai/react';
import { Message } from 'ai';
The ”use client”; directive tells Next.js that this module will only run on the client. The `import` statements make Vercel’s ai library available in our app.
const { append, messages, input, handleInputChange, handleSubmit } = useChat();This initializes the useChat React hook, which handles the state and most of the interactive experiences that users have when using the chatbot.
useEffect(() => {
  scrollToBottom();
 }, [messages]);
The messages array is provided to us by the useChat hook, and whenever the messages array is appended to, this code auto-scrolls the UI for the user.
const handleSend = (e) => {
  handleSubmit(e, { options: { body: { useRag, llm, similarityMetric}}});
}
When a user asks a question, this is the function that handles passing that information to the backend service that figures out what the answer is. Let’s dive into that next.
Using RAG to answer Taylor Swift questions
You can find the backend for our chatbot in the /app/api/chat.tsx file. This is where we are getting the user’s questions and using RAG (retrieval augmented generation) to provide the best possible answer. Check-out the code here, and let’s walk through the entire module now:
import { CohereClient } from "cohere-ai";
import OpenAI from 'openai';
import { OpenAIStream, StreamingTextResponse } from "ai";
import { AstraDB } from "@datastax/astra-db-ts";

const {
  ASTRA_DB_APPLICATION_TOKEN,
  ASTRA_DB_ID,
  ASTRA_DB_COLLECTION,
  COHERE_API_KEY,
  OPENAI_API_KEY
} = process.env;

const cohere = new CohereClient({
  token: COHERE_API_KEY,
});

const openai = new OpenAI({
  apiKey: OPENAI_API_KEY,
  baseURL: "https://open-assistant-ai.astra.datastax.com/v1",
  defaultHeaders: {
    "astra-api-token": ASTRA_DB_APPLICATION_TOKEN,
  }
});


const astraDb = new AstraDB(ASTRA_DB_APPLICATION_TOKEN, ASTRA_DB_ID);
This imports the necessary modules, retrieves our configuration and secrets from the environment variables and initializes clients for the three services that we’re using: Cohere, OpenAI, and Astra DB.
After this, we will define the function that responds to POST requests and retrieve the parameters that are being passed in from the front end code:
export async function POST(req: Request) {
  try {
    const { messages, useRag, llm, similarityMetric } = await req.json();
    const latestMessage = messages[messages?.length - 1]?.content;
Once we have this information, we take the question for the user (the most recent message in the messages array) and use Cohere to generate embeddings for it. Remember, we used Cohere in our ingest step to create embeddings for the corpus of Taylor Swift information, so we want to use the same LLM and model to create embeddings for the question in order to optimize our ability to search and find matches.
    let docContext = '';
    if (useRag) {

      const embedded = await cohere.embed({
        texts: [latestMessage],
        model: "embed-english-light-v3.0",
        inputType: "search_query",
      });

      try {
        const collection = await astraDb.collection(ASTRA_DB_COLLECTION);
        const cursor = collection.find(null, {
          sort: {
            $vector: embedded?.embeddings[0],
          },
          limit: 10,
        });

        const documents = await cursor.toArray();

        const docsMap = documents?.map(doc => doc.text);

        docContext = JSON.stringify(docsMap);
      } catch (e) {
        console.log("Error querying db...");
        docContext = "";
      }
    }
This query pulls back the 10 documents that best match the embedding that’s passed in. It then pulls out the text snippets from each of the documents and stores that in a docContext variable that we will use when we query OpenAI.
    const Template = {
      role: 'system',
      content: `You are an AI assistant who is a Taylor Swift super fan. Use the below context to
 augment what you know about Taylor Swift and her music.
        The context will provide you with the most recent page data from her wikipedia, tour
 website and others.
        If the context doesn't include the information you need to answer based on your existing knowledge
 and don't mention the source of your information or what the context does or doesn't include.
        Format responses using markdown where applicable and don't return images.
        ----------------
        START CONTEXT
        ${ docContext }
        END CONTEXT
        ----------------
        QUESTION: $ {latestMessage }
        ----------------
        `
    };

    const response = await openai.chat.completions.create(
      {
        model: llm ?? 'gpt-4',
        stream: true,
        messages: [Template, ...messages],
      }
    );
    const stream = OpenAIStream(response);

    return new StreamingTextResponse(stream);
  } catch (e) {
    throw e;
  }
The final step is to format the prompt for OpenAI’s chat completion API. We specify the role of system and define instructions for the LLM to follow, context from the data we retrieved from Astra DB and the user’s question. The response from OpenAI is then streamed back to the client using Vercel’s ai library.
Wrapping it up
You can find this application deployed to the internet in all of its velvet glory at http://tswift.ai.
To review, we covered the following:
- Scraping information from public sources of knowledge on the web.
- Chunking text data using LangChain.
- Generating embeddings using Cohere.
- Storing vector data in Astra DB.
- Building a web-based chatbot using Vercel’s `ai` libraries.
- Performing vector search on Astra DB.
- Generating responses using OpenAI.
I know that seems like a lot, but it’s less than 200 lines of non-boilerplate code! We are truly building on the shoulders of giants these days, both in terms of the web, in terms of GenAI and, in this particular case, in terms of Taylor Swift!
If you’re a Swiftie, we hope you have fun playing with SwiftieGPT, and please feel free to share it broadly with your friends and family!
If you’re not a Swiftie, we forgive you. But seriously, all of the concepts here are just as applicable to any other kind of RAG-based chat experience that you might want to build. All the code is open sourced on Github, so feel free to take the code and use it as a template for what you’re building.
If you have any questions about the code, the experience of building on Astra DB, or the new vector experience, you can find me on Twitter. Enjoy!


