As we all know, the job hunt can get tough. Just about everyone has gone through the dreaded cycle of barely getting past the “Upload Resume” stage and receiving rejection email after rejection email. The tedious process tends to look like this:
- Open up a job listing site
- Search for keywords based on the roles you’re interested in
- Apply to 50 different positions
- Tweak your resume, rinse, and repeat
To alleviate the stress that goes along with this, I built ResumAI – a tool that uses RAG (retrieval-augmented generation) and generative AI to remove the laborious tasks from the job hunt. In this post you’ll learn how ResumAI uses DataStax Langflow, Astra DB, and OpenAI to parse your resume, compare it to existing job descriptions, and make suggestions to help you improve it for the job that you want.
What do you need to be able to do?
There are a lot of moving pieces here, so let’s lay out what you’ll want to input, work backwards from our expected output, and then determine what you need.
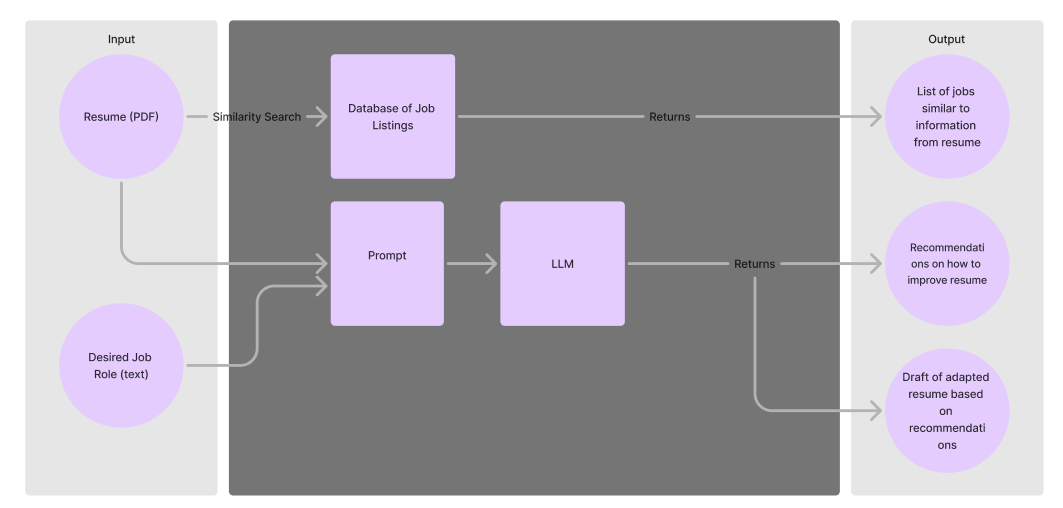
Input: As a user, I want to be able to upload my resume and specify the intended role I wish to apply to.
Output: I want to magically get back feedback on my current resume on how to improve it so it will appeal to my desired role.
The magic happens with a little help from the DataStax AI Platform. I used the vector database, Astra DB, to vectorize and store job listing data, and then the AI application builder Langflow to create the end-to-end flow. We’ll get into that soon, but from a bird's-eye view, it looks a little something like this:
Building the application
To build this app you will need the following prerequisites:
- Python 3.10 or higher
- An OpenAI Account
- A DataStax account to store your vector embeddings and build the GenAI pieces of the workflow. If you do not have one already, sign up for a free DataStax account here.
Set up your Astra DB account
First, log in to your DataStax account. You will be dropped into the Astra DB overview page where you’ll create a serverless vector database.
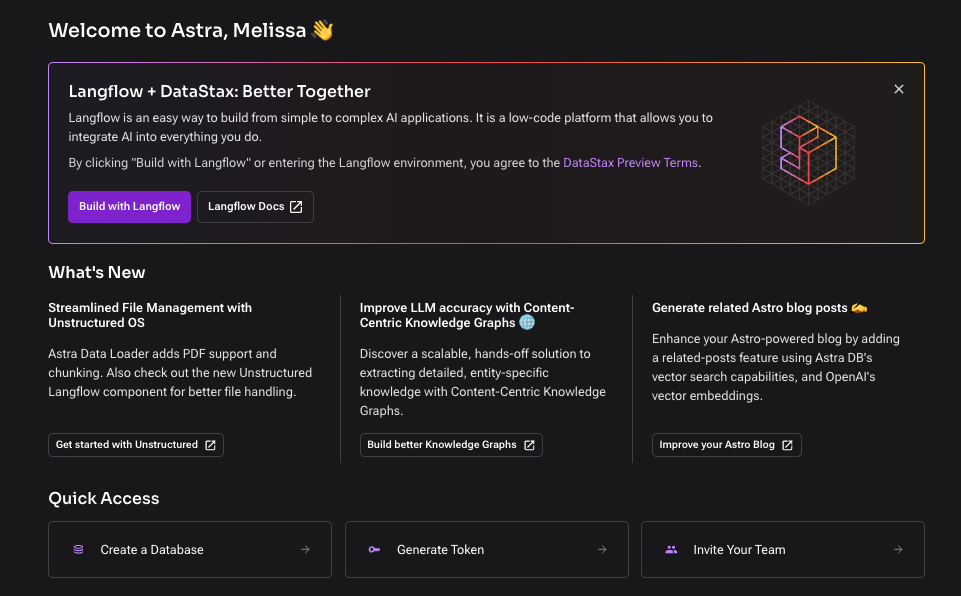
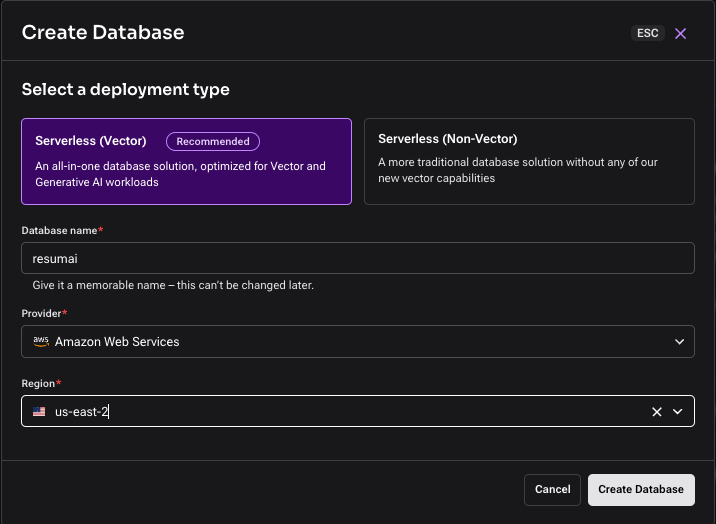
Give your database a name, select your preferred cloud provider, and click “Create Database.” This should take a couple of minutes to spin up.
Next you will set up an Integration. You can find the Integrations tab on the left-hand side navigation bar. Astra DB has a selection of integrations that will enable you to use third-party tools and services. For the purpose of this example, you’ll be setting up the Open AI integration to access their embedding models directly from the database.
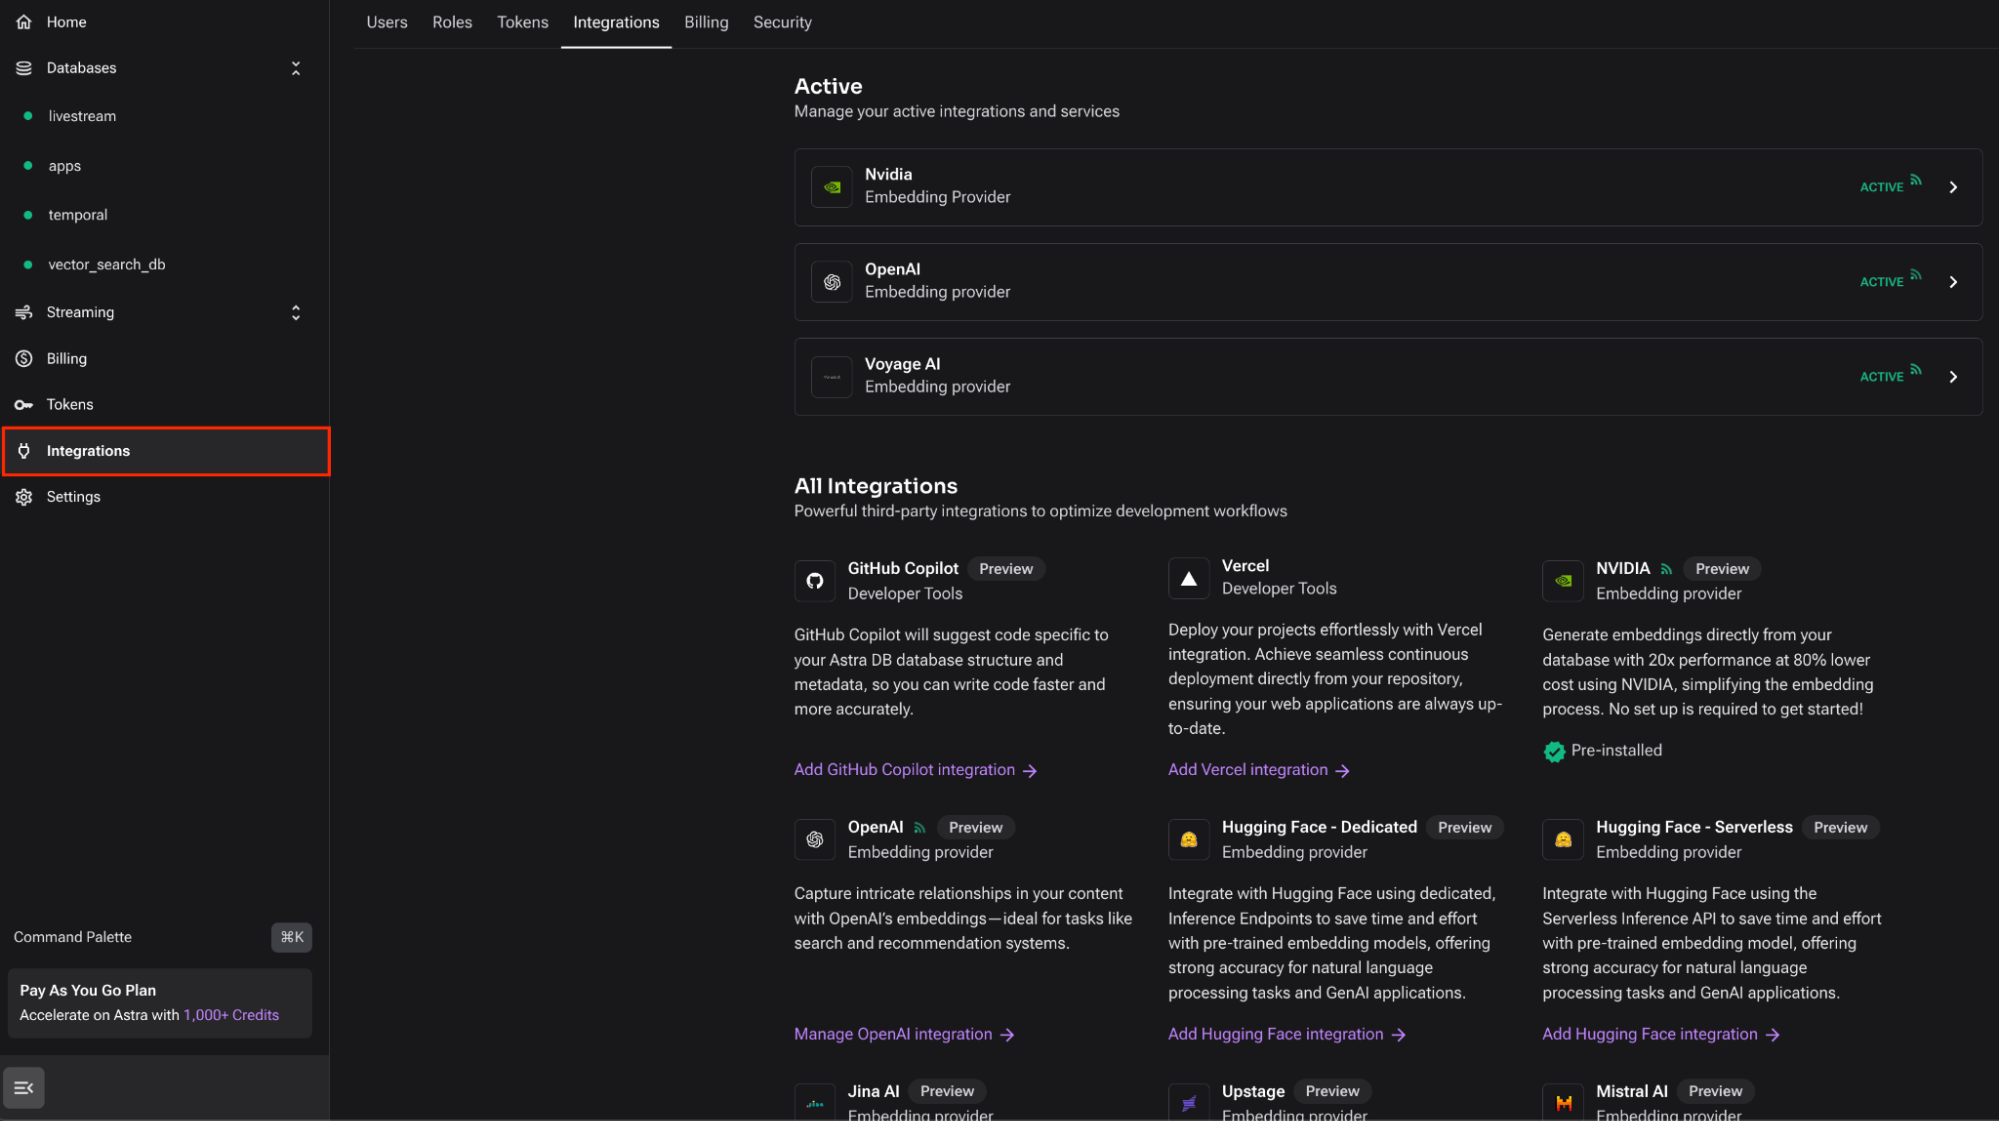
To set up the OpenAI integration, you will need your OpenAI API Key. Select “Add API Key.”
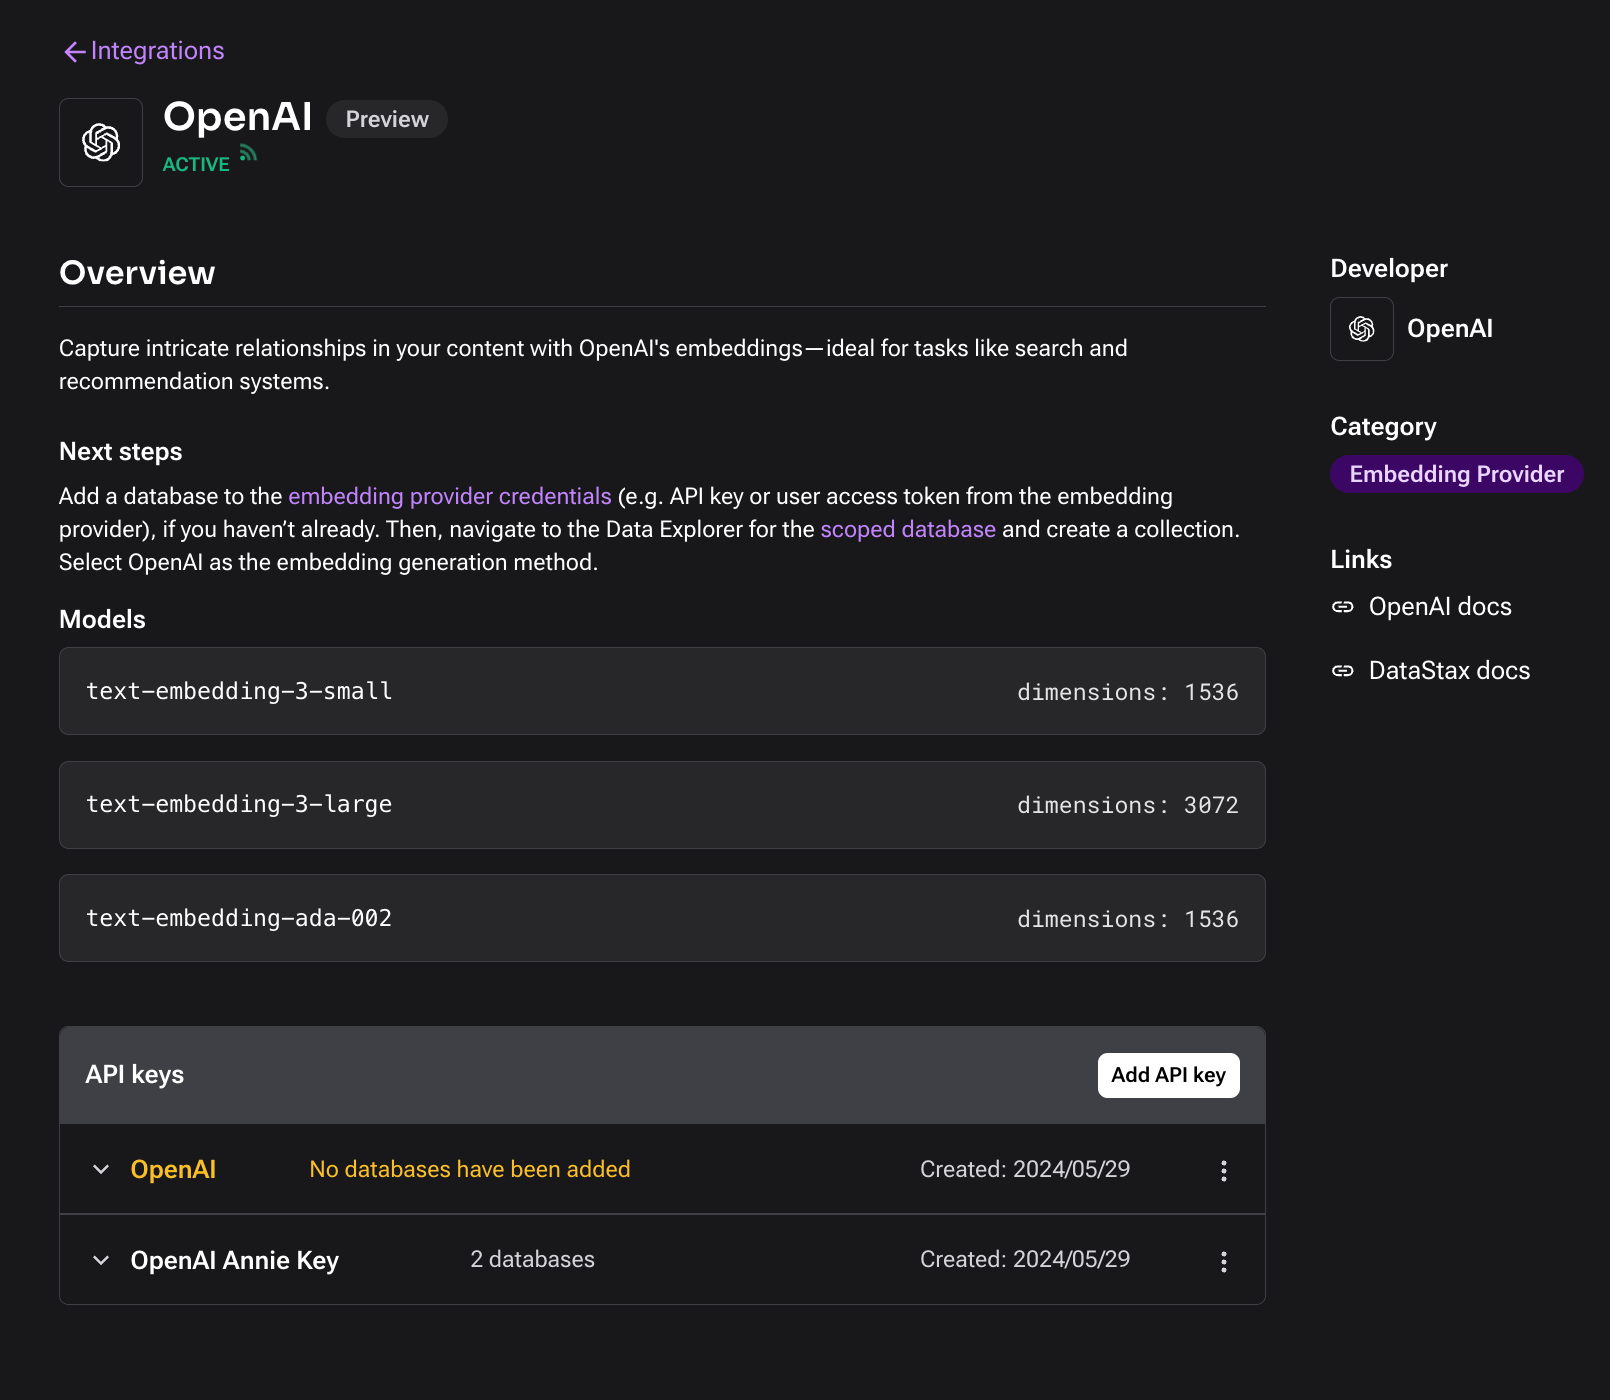
Give your API key a name, your OpenAI key, and for “Add databases to scope” make sure to select the name of the database that you just created.
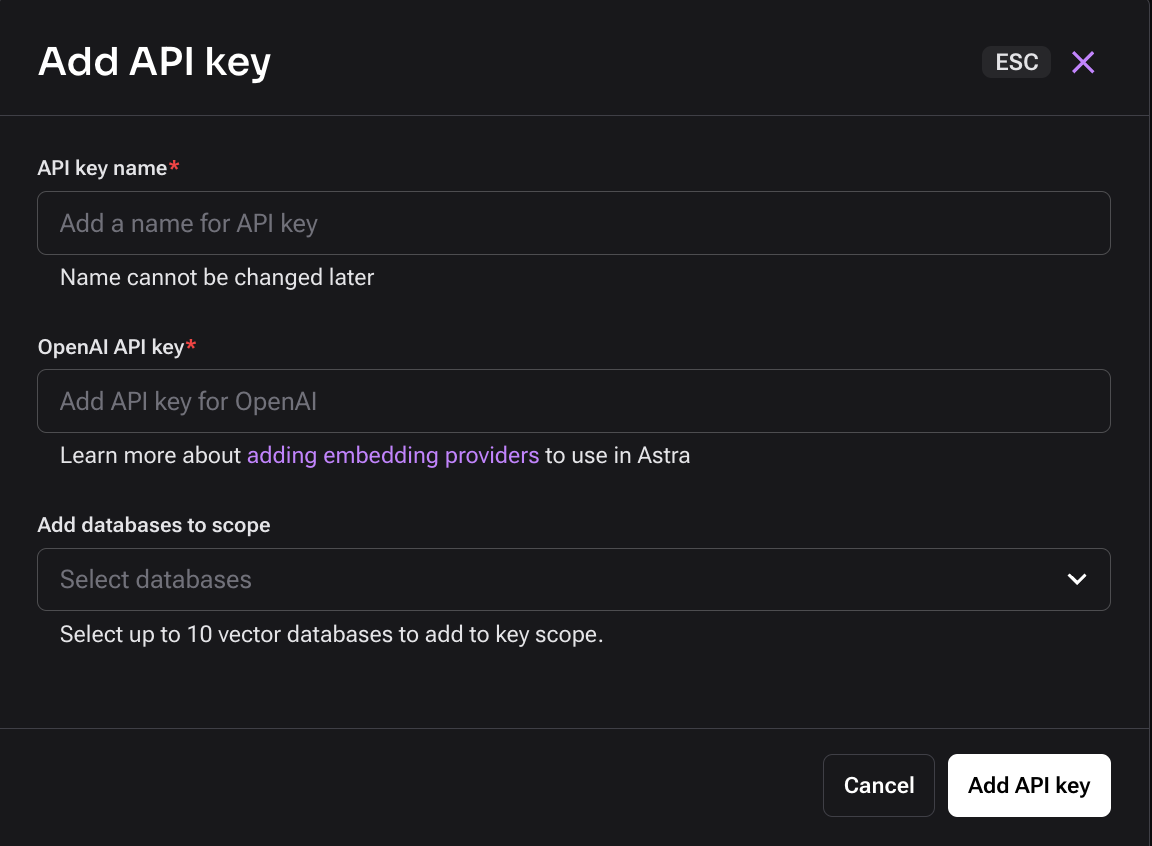
By doing the above, you can now use Astra Vectorize – a feature that will automatically generate embeddings for you at the time of ingesting your data so that you do not have to use an additional API call to call to your embedding provider. You’ll see more of this later in the ingestion code.
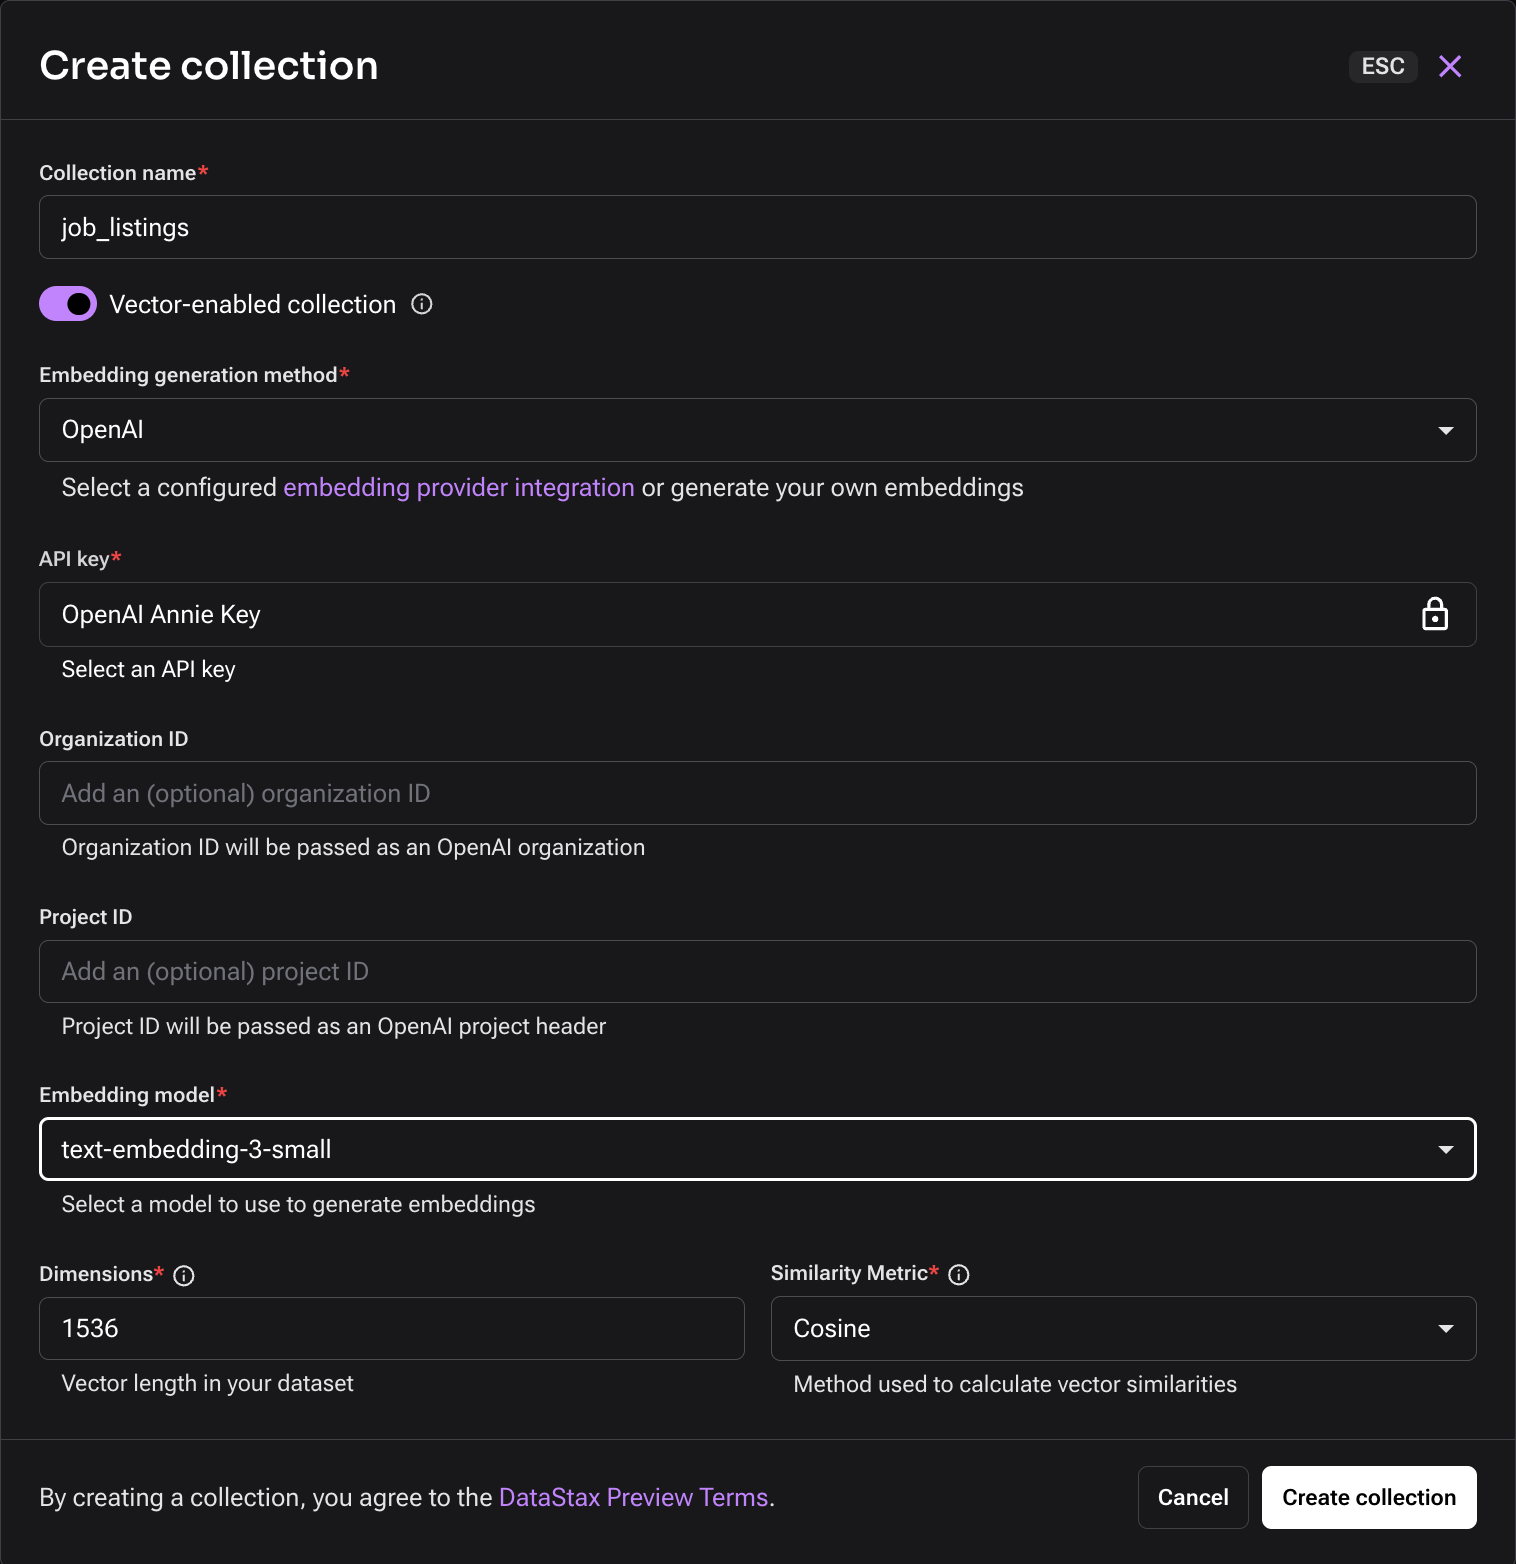
Now you’ll create a Collection by clicking on “Create Empty Collection” or “Create Collection” on the left-side navigation.

You will see this window come up with an option to configure the details of the collection. Name the collection “job_listings” and select your preferred embedding generation method – in this case, it’s OpenAI’s text-embedding-3-small model. To finish setting up your collection, click “Create collection;” this should take less than a minute to complete.
Ingesting and vectorizing job listings dataset
Clone this GitHub repository
git clone https://github.com/melienherrera/resumAI.gitNavigate to the .env-example file. Create a copy called .env and replace the variables with your actual credentials. You’ll need your:
- OpenAI API key
- Astra DB endpoint and application token (which you can retrieve from your database dashboard)
# Astra DB API Endpoint
ASTRA_DB_API_ENDPOINT=https://your_astra_db_api_endpoint

# Astra DB Application Token
ASTRA_DB_APPLICATION_TOKEN=your_astra_db_application_token

# OpenAI API key
OPENAI_API_KEY=your_openai_api_key
Open up the repository in an editor (I use Visual Studio code) and run a Python virtual environment
python3 -m venv .venv
source venv/bin/activate
Install the dependencies using the requirements.txt file
pip install -r requirements.txt Run the load_job_listings.py script. You’ll know that the script is running when job titles appear in the terminal, indicating the record has successfully been added to your Astra DB collection. Let this run for a few minutes to gather a sufficient amount of records.
> python3 load_job_listings.py
Marketing Coordinator
Mental Health Therapist/Counselor
Assitant Restaurant Manager
Senior Elder Law / Trusts and Estates Associate Attorney
Service Technician
Economic Development and Planning Intern
Producer
Building Engineer
Respiratory Therapist
...
The script loads a public dataset of Linkedin Job Listings between 2023-2024 to give a snapshot of what the current listings in the job market looks like. I put this into a HuggingFace collection to make it easier to load the file because it was pretty large. By doing this, you can use the datasets library to reference and load the dataset.
from datasets import load_dataset

ds = load_dataset("datastax/linkedin_job_listings")
Next, ingest and vectorize the content from the dataset using Astra DB’s Vectorize feature and OpenAI’s text-embedding-3-small model. In the following code block you combine the title and description columns into a variable named content. Then, use the Data API to insert each record from the dataset into the job_listings collection in Astra DB.
Notice how you pass the content variable into the $vectorize keyword, which generates the vector embedding for the given content on the fly. No need to write additional code to call to the embeddings model provider.
content = (row['title'] + "\n\n" + row['description'])

   while True:
       try:
           collection.update_one(
               {'_id': row['job_id']},
               {'$set': {
                   'job_title': row['title'],
                   'company': row['company_name'],
                   '$vectorize': content,
                   'max_salary': row['max_salary'],
                   'pay_period': row['pay_period'],
                   'location': row['location'],
                   'content': truncate_content(content),
                   'metadata': {'ingested': datetime.now() }

               }},
               upsert = True
           )
       except Exception as ex:
           print(ex)
           print("Retrying...")
           continue
       break
Great! You now have a collection of job listings stored in your database. You’ll use this later to perform a vector similarity search against the uploaded resume and return top job matches.
Build the GenAI flow
You’re probably wondering now – where does the GenAI part come in? Within DataStax’s AI platform, there is an awesome tool called Langflow that you can use to build GenAI apps block by block—literally.
To get to Langflow from Astra DB, simply use the dropdown menu at the top of your dashboard screen.

You can create a new flow by clicking the “Create Flow” button, which will bring up this start up menu.
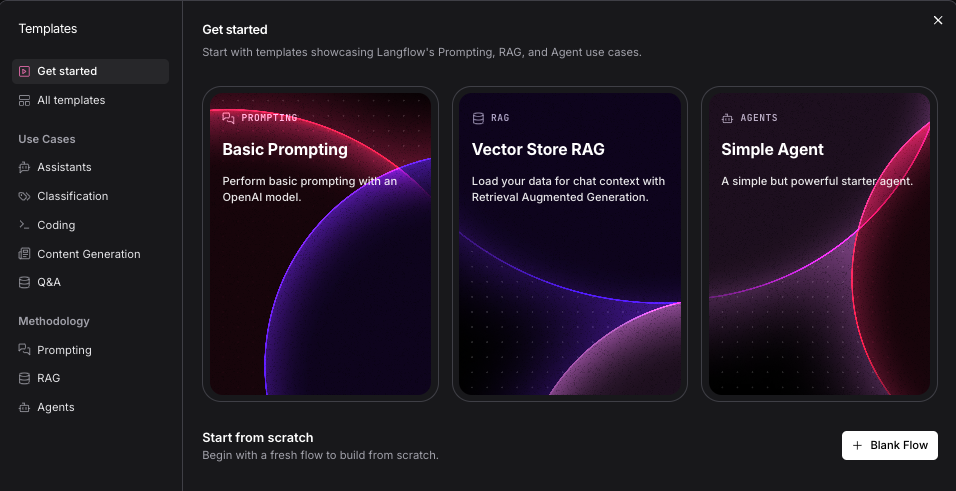
For the purpose of this tutorial, the flow is already baked into the app so you do not need to rebuild it (unless you want to 😉). As mentioned, I used Langflow to build out the GenAI backend for the app. Langflow offers an array of components from many different providers for every step of the development process: prompts, embeddings, chunking/parsing data, and of course, vector stores like Astra DB.
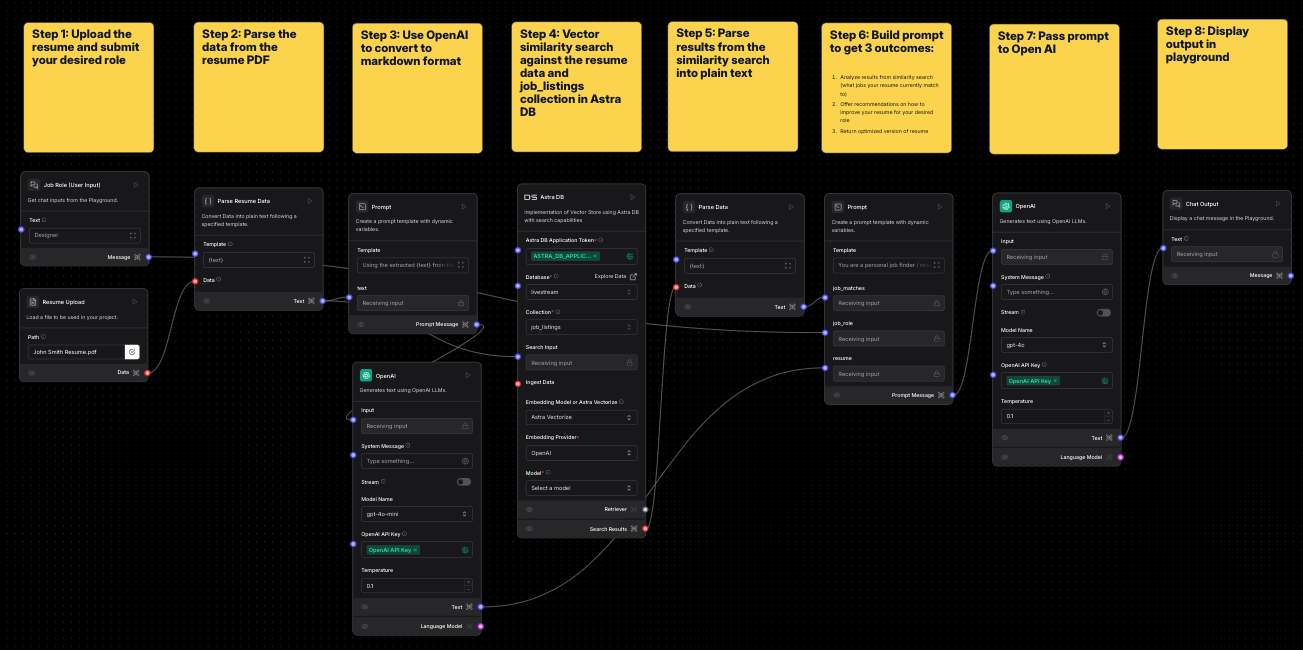
Step 1. Upload the resume and your desired role
Use the File component to accept a PDF upload for the resume and Text Input component, which allows for user input into the application; in this case, the desired role they would like to apply to.
Step 2: Parse the data from the resume PDF
You need to textualize the information from the PDF file, so you’ll use the Parse Data component to convert the PDF file to plain text.
Step 3: Use Open AI to convert to markdown format
Here's where things start to get a little fancy. Now that you have the textualized data from the PDF, you still want to keep the structure of the resume (headings, subtext, name and email, etc). When building this initially I was looking into different resume parser libraries available in Python, but nothing gave beautiful results. My next thought was to just see if an LLM could do this for me. Here, I used the Prompt component to simply say “Using the extracted {text} from the resume pdf file, please convert this to markdown format as best as possible,” then give it to the OpenAI Models component by simply linking the two together like so:
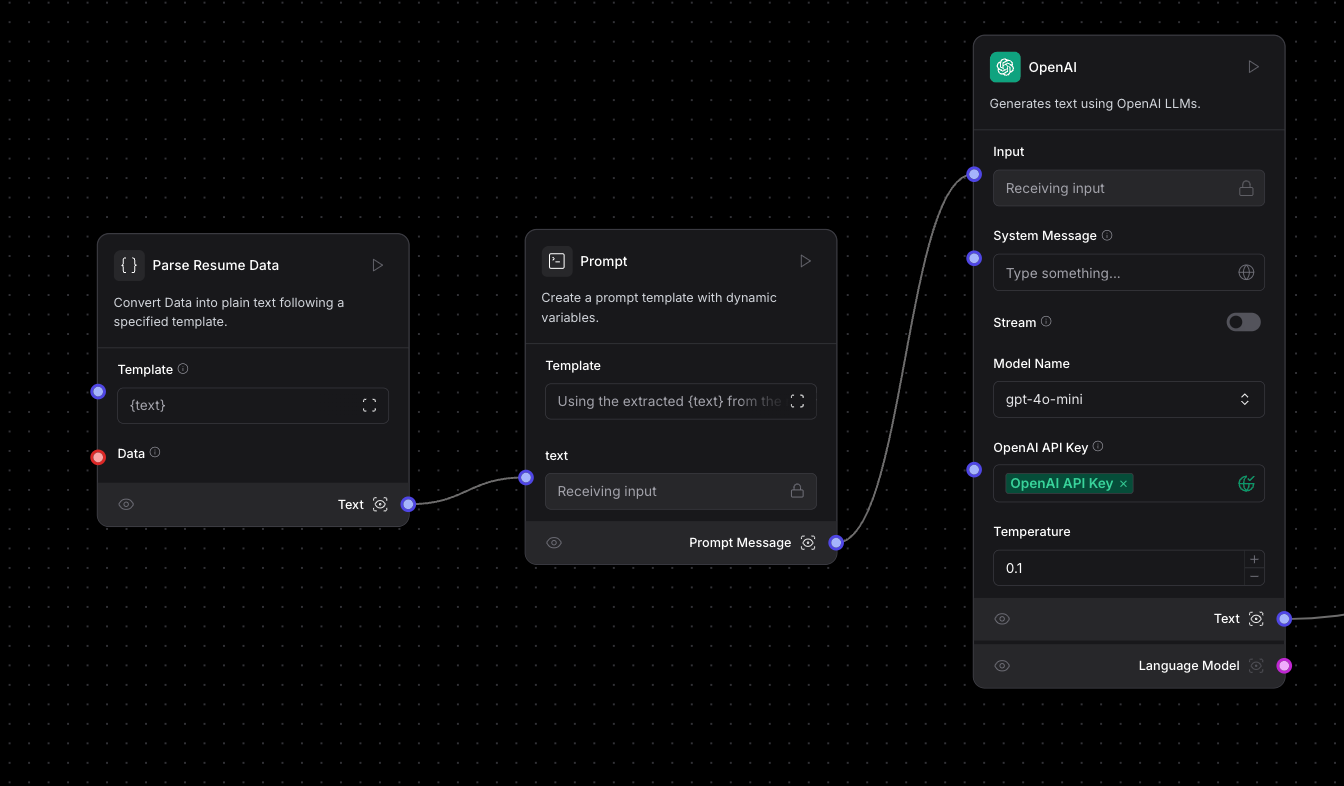
Note that in the Models component, it asks you for your Open API Key. You can save this as a variable using the globe icon on the right so that you can easily reuse the variable multiple times across different components for later use.
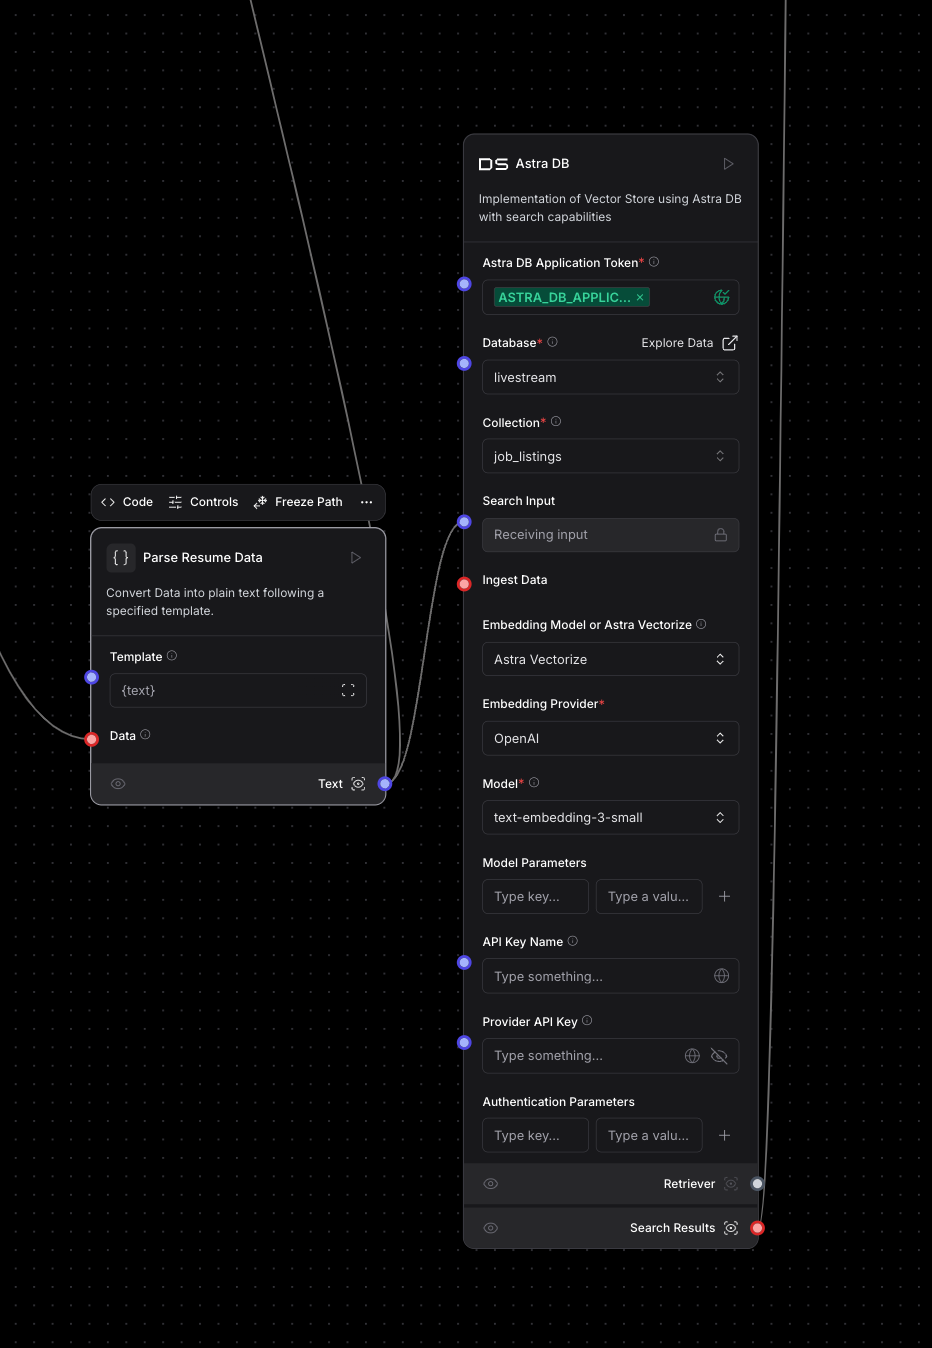
Step 4: Vector similarity search against the resume data and job_listings collection in Astra DB
Next, you need the Vector Store component to talk to your Astra DB collection. Here, you take the parsed data from Step 2 and use it as search input for your database. You just expect results that tell you what job listings “match” the current resume. Additionally, if you remember from the ingestion code, you used Astra Vectorize to generate the embeddings for each job listing. In this component, under “Embedding Model or Astra Vectorize” you can select “Astra Vectorize,” which will bring up several other fields for you to identify the respective Provider and Model you used. In this case, that is OpenAI.
Step 5: Parse results from the similarity search into plain text
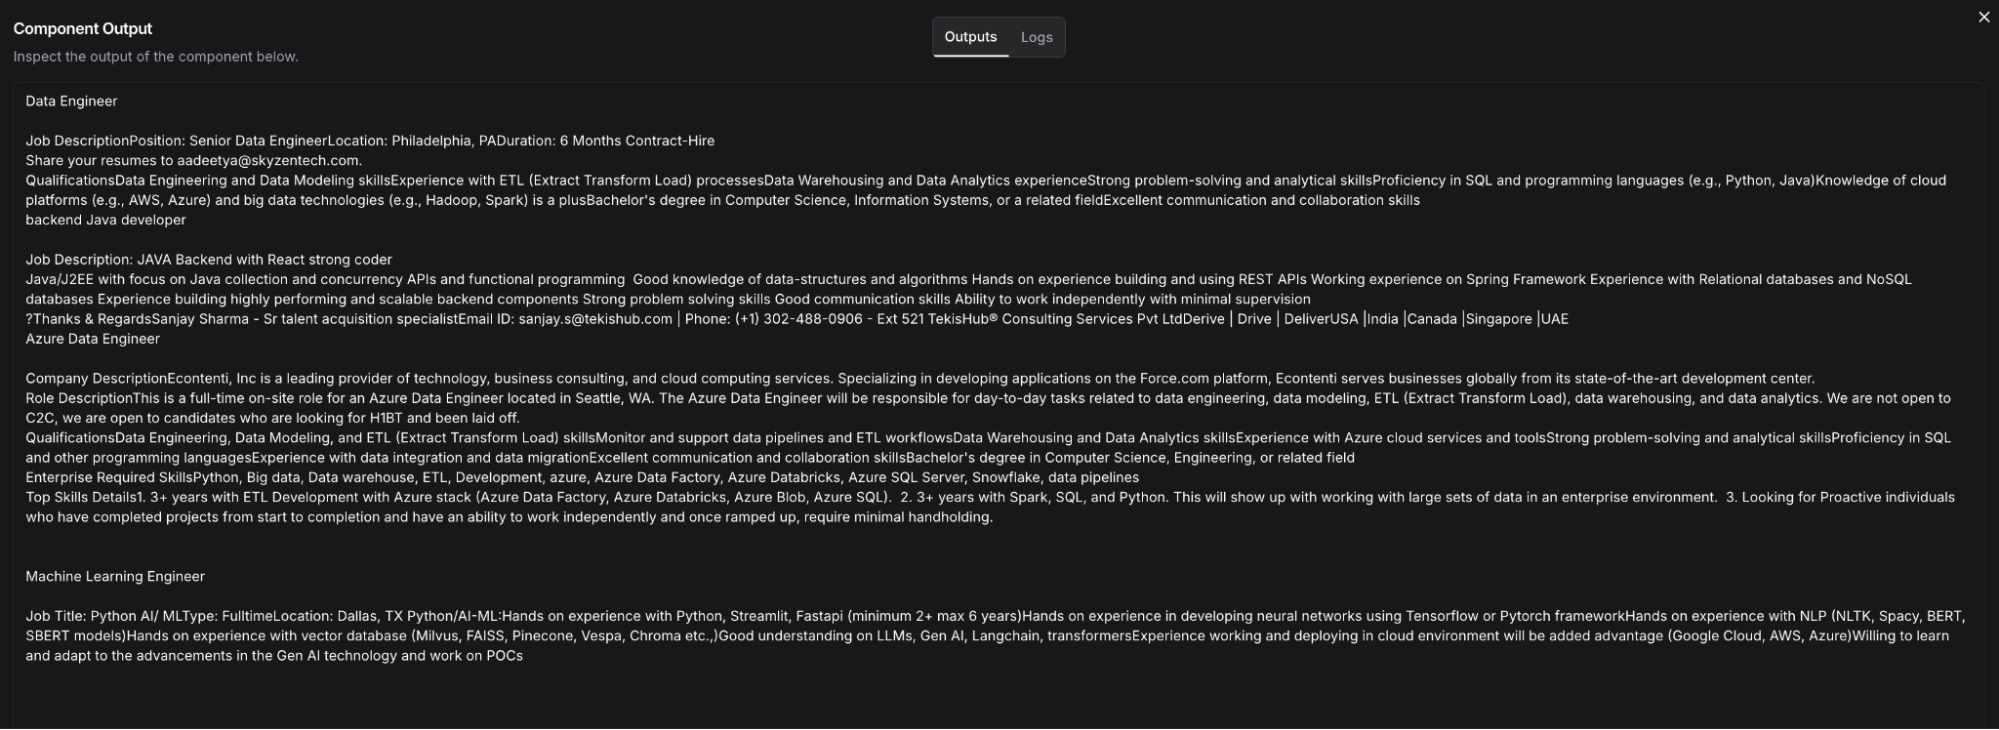
Next, use the Parse Data component once more to parse the results returned from our similarity search to Astra DB. For reference, you can inspect a component to see exactly how the output is formatted by clicking on the icon next to the output:
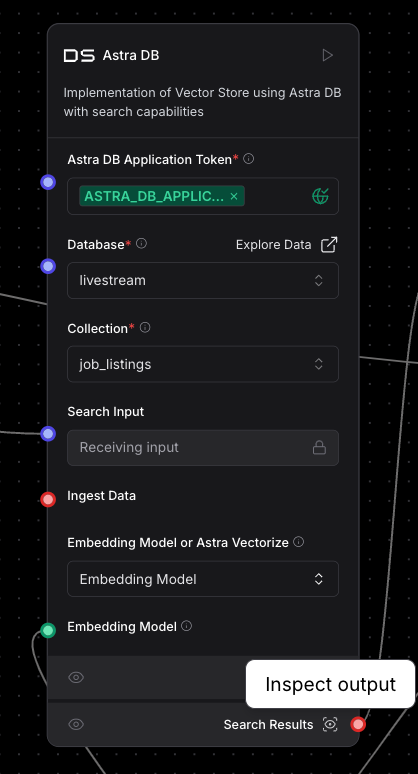
The retrieved information looks like this:

After putting this through the Parse Data component, you essentially pull the data from this tabular format to plain text like this:
Step 6: Build prompt to get three outcomes
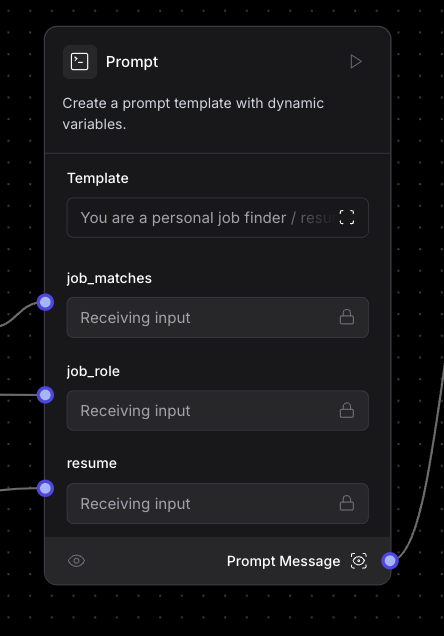
Now it’s time to build your prompt. At this point, you have three pieces of data that are needed to prompt the LLM and give you the inference you’re looking for. You have:
- The user’s desired role
- Our resume data in plain text
- Job matches in plain text
You can feed these three things to our prompt by creating variables within the Prompt component. All you need to do to create a variable is surround a variable name with curly brackets (for ex. {job_matches}) within your prompt and it will appear as a connection point on the component itself.
Step 7: Pass prompt to Open AI
Next, you want to pass our prompt to our Model component – in this case, you’re using Open AI’s gpt-4o model. This component requires an input and your API key which you should have saved as a variable earlier.
Step 8: Display output in playground
Let’s see the output! Hook up the final component which is Chat Output. This will allow you to view the results of all the other components in the Playground area of Langflow. Once you click the Playground button, it will run all the individual components in the flow you built. If there is something broken or some invalid input/output, the component with the issue will indicate the error. Otherwise, each component should show a green checkmark.
Step 9: Export Langflow flow
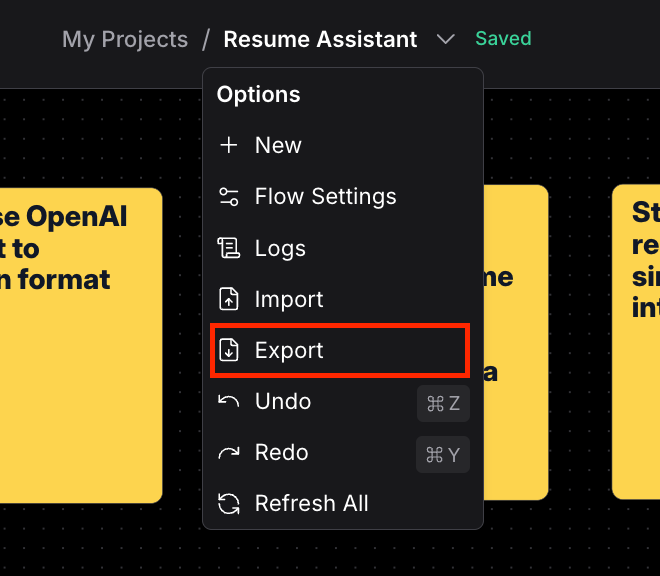
Finally, you’re going to export the flow so that you can reference it in the application. Click the name of your flow at the top of your screen, and select “Export” from the dropdown. This will wrap the contents of your flow into a JSON blob that you can use in Python code. You’ll see how to do this in the next section.
Hooking it up to Streamlit frontend
Now that you’ve got the backend working and displaying the output in the Playground, how can you seal this up in a simple UI? Streamlit is a great tool for creating frontend components and deploying apps.
In you app.py you’ll find the Streamlit code that handles the frontend functionality, such as applying an image and text header, text input box, upload PDF file option, and how it connects to the Langflow flow that you build for the backend functionality.
You must import the streamlit library to be able to reference the components needed. Once you do this, you can pass the same environment variables that you used earlier in the tutorial directly into Streamlit using st.secrets[“YOUR VARIABLE NAME”].
import streamlit as st
from langflow.load import run_flow_from_json
import tempfile
import os
from dotenv import load_dotenv

# Load env vars
load_dotenv()
openai_api_key = st.secrets["OPENAI_API_KEY"]
astra_db_token = st.secrets["ASTRA_DB_APPLICATION_TOKEN"]
astra_endpoint = st.secrets["ASTRA_DB_API_ENDPOINT"]
To add components such as text input or file uploads, you can use functions like st.file_uploader or st.text_input to display these options for the user to give their Desired Role and upload their resume PDF.
# user inputs desired role
desired_role = st.text_input("Desired Role:", key="desired_role", help="Enter the job role you are looking for.")

# file upload
temp_file_path = None
uploaded_file = st.file_uploader("Upload Resume", type=["pdf", "docx"])
if uploaded_file is not None:
   with tempfile.NamedTemporaryFile(delete=False, suffix=".pdf") as temp_file:
       temp_file.write(uploaded_file.getvalue())
       temp_file_path = temp_file.name
Above you’ll notice you imported run_flow_from_json from the Langflow package. This enables you to access the flow you built in your Python application via the Langflow runtime. You can find the starter code in the Langflow UI by clicking the “API” button in the top right corner.
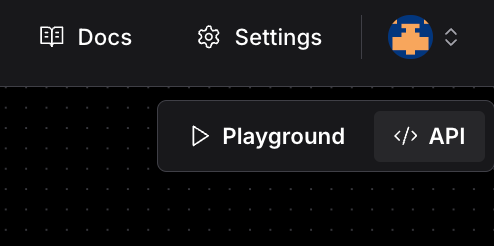
This will bring up a window with several options to connect with your Langflow flow via cURL, JS API, etc. We are using “Python Code.”
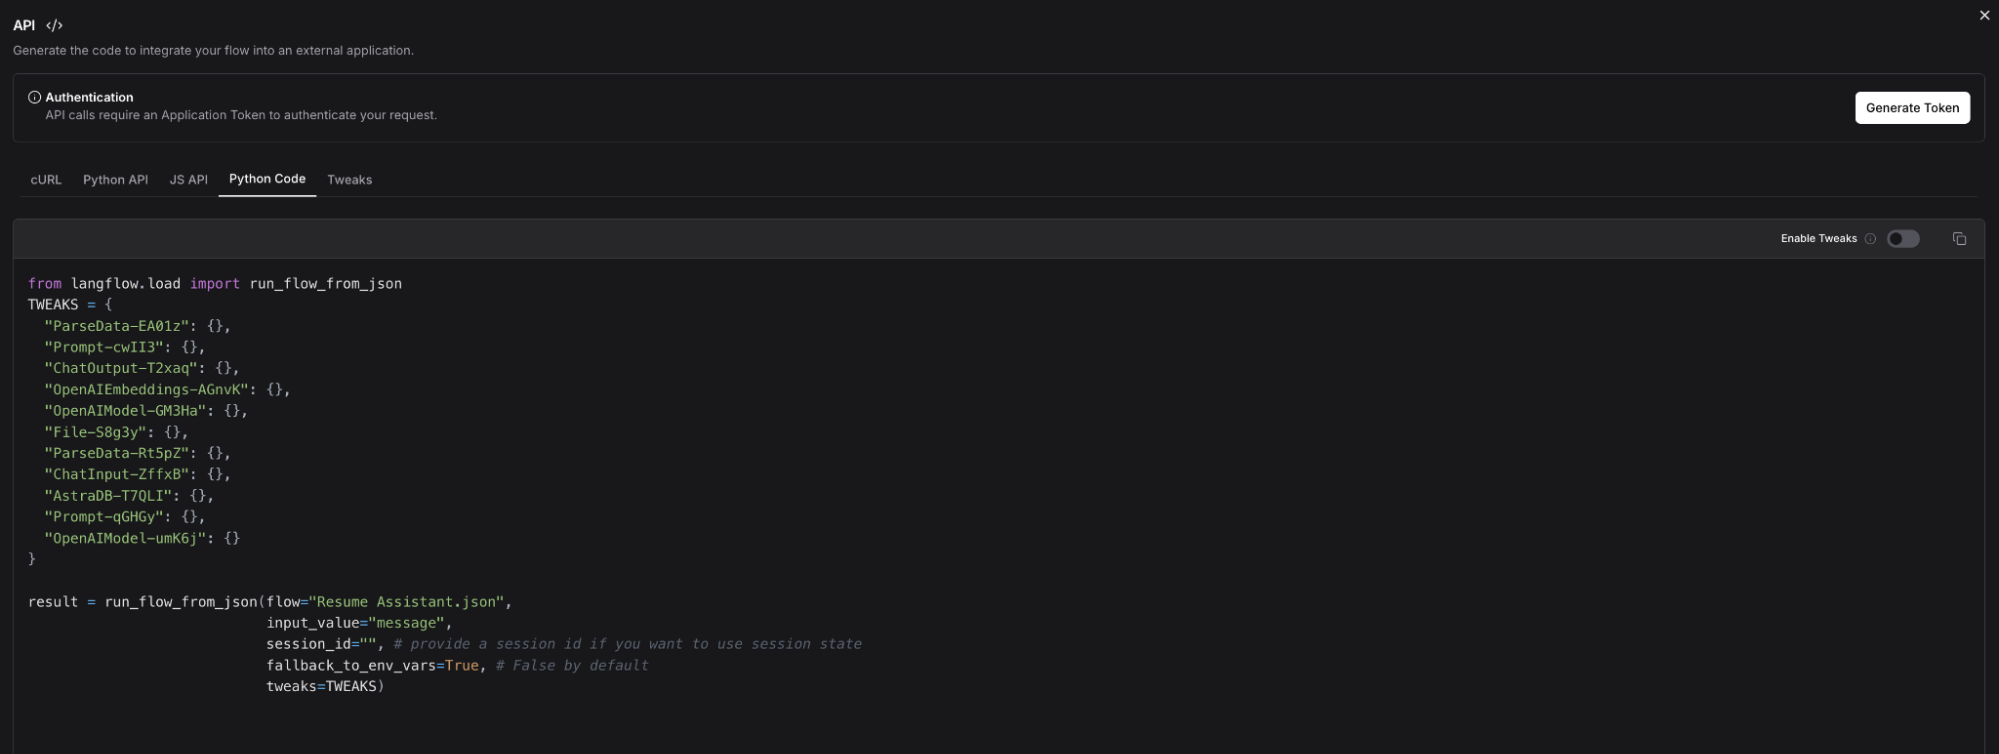
Within the tweaks, you’re passing certain parameters that were retrieved from the user such as the Desired Role and the resume PDF upload to go through the workflow as it was built in the Langflow UI. Finally, you display the results to Streamlit as you did in the Playground using st.button to create a Submit button and st.write to write the final results.
# Langflow Implementation
TWEAKS = {
 "ParseData-EA01z": {},
 "Prompt-cwII3": {
 },
 "ChatOutput-T2xaq": {},
 "OpenAIEmbeddings-AGnvK": {
   "openai_api_key": f"{openai_api_key}",
 },
 "OpenAIModel-GM3Ha": {
   "openai_api_key": f"{openai_api_key}",
 },
 "File-S8g3y": {
   "path": f"{temp_file_path}",
   "silent_errors": False
 },
 "ParseData-Rt5pZ": {},
 "ChatInput-ZffxB": {
     "input_value": f"{desired_role}",
 },
 "AstraDB-T7QLI": {
     "api_endpoint": f"{astra_endpoint}",
     "token": f"{astra_db_token}",
 },
 "Prompt-qGHGy": {},
 "OpenAIModel-umK6j": {
   "openai_api_key": f"{openai_api_key}",
 }
}

# Submit
if st.button("Submit"):
 st.write(f"Your desired role is: {desired_role}")
 st.write(f"Thank you for submitting the form 🙏")
  with st.spinner('Loading your results...'):
   result = run_flow_from_json(flow=langflow_json,
               input_value=f"{desired_role}",
               fallback_to_env_vars=True, # False by default
               tweaks=TWEAKS)

 message = result[0].outputs[0].results['message'].data['text']
 st.write(message)
Run streamlit run app.py to start the app—and there you have it! You can test the app by giving it a Desired Role and uploading a resume.
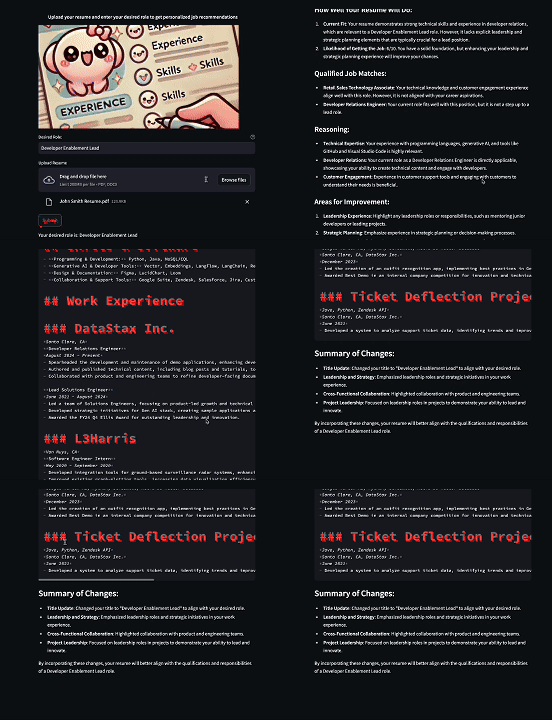
Wrapping up
You’ve built a functional GenAI application that can assist with your next job search and help improve your resume using Langflow, Astra DB, and Streamlit. In this blogpost, you learned how to:
- Ingest and vectorize data and store it in Astra DB
- Build an end-to-end GenAI flow in Langflow
- Build a functional UI in Streamlit
- And connect the UI to your Langflow flow with Python code
Feel free to test out resumAI via the Streamlit deployment or stand up the app yourself and make adjustments to your own Langflow flow. With the amount of different components within Langflow, there are no limits to what you can build. Happy building (and job searching)!
