

This step-by-step video tutorial on building a machine learning model is taught by Coding for Entrepreneurs’ Justin Mitchel and sponsored by DataStax.
You’ll learn to create a machine learning model, train it, and turn it into a REST API. Whether you’re new to machine learning or keen to learn best practices, this is a fantastic hands-on project to build a custom machine learning model from scratch.
This is the first of a two-part series covering how to:
- Train and build an AI model
- Integrate a NoSQL database (inference result storing)
- Deploy an AI Model into production
In this first part, you’ll create and train a spam detection machine learning model from scratch and turn it into a production-ready REST API. In the next part, you’ll deploy it into production.
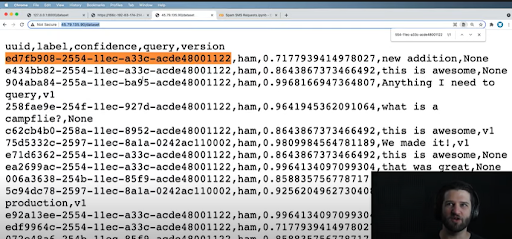
Figure 1. Demo showing deployed version on ngrok predicting spam or ham (not spam).
Handling spam content has gotten easier with deep learning and AI. Over time and with the aid of direct user feedback our spam classifier will rarely make mistakes. This tutorial build uses the following technologies.
- Astra DB, the Apache Cassandra database-as-a-service managed by DataStax
- Jupyter Notebook, a web-based interactive computing platform
- Google Colaboratory, a hosted Jupyter notebook service to write and execute arbitrary python code
- Keras, a high-level, deep learning API developed by Google for implementing neural networks
- FastAPI, a popular web framework for developing REST APIs in Python based on pydantic
- pydantic, a library for data parsing and validation
Requirements for our machine learning spam classifier
We assume you’ve already got experience with Python. If you don’t, check out Coding for Entrepreneurs’ 30 days of Python series.
If you already have a solid foundation in Python, you can jump straight in. If not, our video tutorial will show you how to do the build, step-by-step. All of our code is on GitHub: AI as an API and the AI as an API Course Reference, which is updated over time.
We will use DataStax Astra DB to automatically connect to Cassandra, which gives us up to 80 gigabytes for free. Start by signing up for an Astra DB account. You can also go through the checklist of what you need to download and install in this requirements.txt on GitHub.
Set up a project on VSCode and prepare your datasets
The first step is to configure our project using Python and Visual Studio Code. We used Python 3.9 in this tutorial and recommend that you use at least 3.6 or above. Download both Python and VSCode and save the project in a folder. Then, create and activate a virtual environment. If the folder name comes out in parenthesis after the code, you’ll know that it has been activated.
Here is an overview of how to set up, prepare, and export your datasets to prepare your training data for the machine learning model. We walk you through these steps in detail in the video.
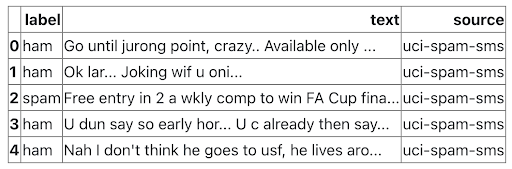
Figure 2. Turning dataset labels into number representations, then into vectors
- Prepare datasets: to create our AI algorithm, we need a dataset. We’ll use a dataset from the machine learning repository of the University of California at Irvine (UCI). UCI has all kinds of open source datasets we can use in our projects. Download it by following the guide to this process on AI as an API GitHub
- Download and unzip datasets: we prefer to automate as much as possible. When you experiment with building actual AI models, you need an easy way to grab datasets from anywhere without extra configuration. We show you how to do this on Jupyter Notebook and how to create a base directory using Python here
- Extract, review, and combine dataset: use Python pandas, input the code to review and combine your datasets, then export it, with these step-by-step instructions. Once you’ve exported the dataset, you’ll see all the data on VS Code – about 7,000 texts from UCI’s SMS Spam Collection Dataset. Some texts might be duplicates. But don’t worry about it as the dataset is still small. For now, we just need to prepare this data set for training purposes by turning them into vectors
- Convert dataset into vectors: much of machine learning is based on linear algebra. This means we work with matrix multiplication and vectors. The challenge of matrix model multiplication is that our data has to be the same sequence length. We then use Keras to convert our dataset into vectors, which we explain in the tutorial
- Split and export vectorized dataset: now, split up and export your training data to have variants in your training data. Imagine you’re playing a game with a friend. That friend beats you in the first 10 games using the same strategy. If he never changes his strategy, you’ll eventually learn his moves and beat him. Machine learning is the same analogy. We can’t focus too much on one way of being “correct”. Split up data as much as possible in the early days of building out this algorithm. You’ll find all codes and instructions for this on GitHub and in our video tutorial.
Training our machine learning model
Now that we’ve prepared our dataset, it’s time to train our AI Spam Classifier. This blog post from Coding for Entrepreneurs has the most up-to-date information on the actual classifier training itself. We recommend that you launch this notebook on Google Colab. It offers free GPUs you can copy to your drive and make changes to.
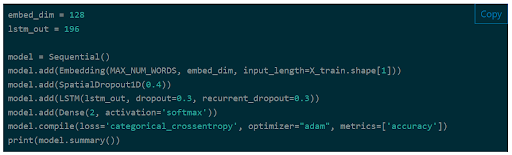
Figure 3. The Long Short-Term Memory (LSTM) machine-learning model.
On Keras, you’ll find substantial documentation created by other great machine learning data scientists. They spend considerable time finding the best models for any given problem area.
We’re using the Long Short-Term Memory (LSTM) model. It’s common for text-related data created by Keras and one of the best models for cross-category classification. It works for two labels or more, like our spam classifier which has only two labels, spam or ham.
Once you’re done with training the model outlined in our video and our post, it’s important to upload your model, tokenizer and metadata to object storage. Since our machine learning model will get massive, cloud-based services are best for storing almost an unlimited amount of data.
You can set up two object storage providers – Linode and Digital Ocean. Then upload these three files to one or both of them:
- Spam classifier metadata
- Spam classifier tokenizer
- H5 spam model (not the CSV or pickle file)
The next step is to implement a pipeline and script on the cloud storage provider you chose to download the same three files in a repeatable manner. Make sure you have pypyr and boto3 installed. Click here for the code and follow the video instructions.
Configuring FastAPI
Now, let’s turn to the API portion of this project. There are three things you’ll need to do.
- Create a base directory for FastAPI
- Load it in the Keras model and the tokenizer on FastAPI
- Implement the predict method with Keras and FastAPI
Once those steps are executed, we’re going to create a reusable AI model class. You can skip this part if you’d rather focus on deploying an AI model into production as soon as possible.
This process is tedious because we’re re-implementing what we already did. So actually doing this re-factoring or watching how it’s done isn’t necessary. But it can improve the data class or model.
After you’ve configured your base FastAPI app and loaded your Keras model and predictions, you’ll have a machine learning production-ready REST API.
Setting up AstraDB and integrating Cassandra
This REST API has three primary purposes:
- Provide accurate predictions on whether a string of text is spam or not
- Improve conditions for the model to make better predictions
- Deploy the model openly for production for other applications and users around the world
To improve conditions of the model, you’ll store your spam or ham queries which are up to 280 characters maximum. Some of the prediction results on the NoSQL database Cassandra, managed by DataStax through DataStax Astra DB service.
After signing up for your free Astra DB account, you’ll be able to store up to 80 gigabytes of free data monthly. You’ll get the API keys you need to configure your environmental variables with these step-by-step instructions.
Then, install pydantic for FastAPI. By default, all your configurations for environment variables and others that you might want on your project are included. So you’ll just need to create base settings for pydantic. Watch how to do this here.
Once your project is ready to integrate with Astra DB, jump into the Astra DB console, create a database, and download the Cassandra driver as a secure bundle. Then, configure your Astra DB cluster and session with these instructions.
Then go ahead and create the Cassandra model to store your data. The first is the actual query used in our inference data in Figure 4. The second is the inference itself. There are only two labels in this case. You’ll just need to store one of them — the label for “ham” and the confidence ratio. Watch the video to see how to create the Cassandra model and then how to store inference data in the model. Finally, you’ll also want to paginate the
Cassandra model to see all data objects you’ve listed in there.
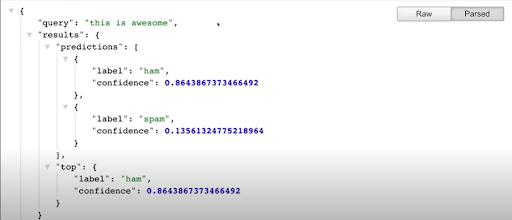
Figure 4. Inference data to be stored on Cassandra.
You would now have an amazing way to extract a good chunk of the data that you stored in your Astra DB database. Cassandra offers eventual consistency, meaning our entire cluster of dataset will eventually have the correct data in it because it stores data using primary keys.
What we really love about Astra DB is that we can add any fields and data we need really fast. It would be interesting to test your limits. If you’re comfortable, try to see how fast Astra DB responds if you put in a million entries. Share your results with us on Twitter.
Testing it out
Before you go into production, let’s test your AI as an API through ngrok. This emulates a production environment by exposing a local project to the world so you can test it in Google CoLab. You’ll need to add in a schema with pydantic to get the correct data coming through from your post data. Watch this part of the video to test out your AI as an API.
Conclusion
If you’ve followed this article and our video tutorial, you now know how to:
- Prepare datasets for machine learning using Python, Jupyter Notebook, and Keras
- Train a Long Short-Term Memory (LSTM) machine learning model using Keras
- Convert your machine learning model into production-ready REST API with FastAPI
- Integrate your AI as an API with Astra DB, manage Apache Cassandra database, and test it out with ngrok
But it doesn’t end there. In Part Two, you’ll deploy this application from scratch on a virtual machine into production so anyone in the world can use it. This is a bit different from a standard Python web application because of the nature of our machine learning model.
We’ll go through everything you need to ensure that your model runs perfectly. Make sure you also check out our blog series on Real-World Machine Learning with Apache Cassandra and Apache Spark. Stay in touch with our developer community on Twitter.
Resources
- Astra DB: Multi-cloud Database-as-a-service Built on Cassandra
- DataStax Medium
- DataStax Developer YouTube Channel
- DataStax Developer Twitter
- DataStax Cassandra Developer Workshops
- DataStax Academy: Apache Cassandra Course
- Real-World Machine Learning with Apache Cassandra and Apache Spark Part 1
- Real-World Machine Learning with Apache Cassandra and Apache Spark Part 2
- YouTube Tutorial: AI as an API Part 1
- AI as an API Course Reference GitHub
- 30-Days of Python Series


%20%7C%20DataStax&_biz_n=5&rnd=449379&cdn_o=a&_biz_z=1743628326197)
%20%7C%20DataStax&rnd=607258&cdn_o=a&_biz_z=1743628326200)
