Editor's Note: Effective February 1, 2020, DataStax will no longer be selling DataStax Distribution of Apache Cassandra. For enterprises interested in support for Apache Cassandra, DataStax Luna is available. Go to luna.datastax.com for more details.
We recently announced availability of DataStax Distribution of Apache Cassandra on Microsoft Azure aimed at helping developers take advantage of a simpler, more cost-effective way to build and scale applications. We wanted to take our experience with large scale deployments on Azure for over 5 years and deliver an environment with best practices built-in so you can focus on your business. With that in mind, let’s jump into what you need to know to build an app.
Connect to your cluster using any of the drivers for Apache Cassandra®, which comes in different languages such as Java, Python, C++, C#, Node.js, Ruby, and PHP.
Below we'll go through the steps to create a simple Java application using version 3.7.1 of the DataStax Java Driver for Apache Cassandra®.
Note: There are API changes for newer versions of the Java driver (4.0+). Please make sure you use the appropriate version for this example.
Prerequisites:
- Set your deployment to use public IPs for your nodes
- Download the driver from Github and add to your CLASSPATH, or you can add the following dependency to your Maven POM file:
<dependencies>

    <dependency>

        <groupId>com.datastax.cassandra</groupId>

        <artifactId>cassandra-driver-core</artifactId>

        <version>3.7.1</version>

     <dependency>

<dependencies>
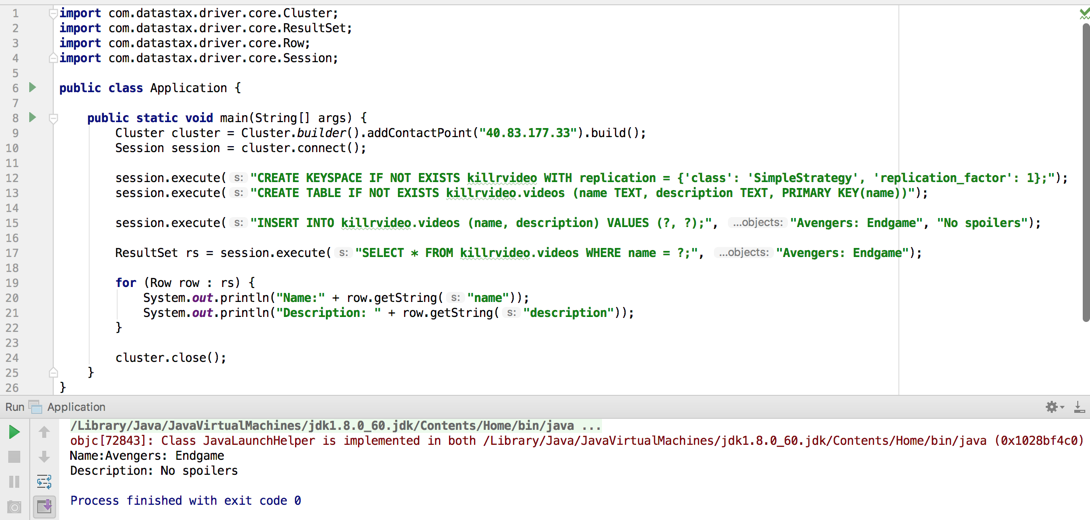
1. Create a Cluster object
Cluster cluster = Cluster.builder().addContactPoint("40.83.177.33").build();
- The Cluster object is the starting point to connect to a Cassandra cluster, and is created using the Cluster.builder() helper class.
- Replace the IP address shown in the addContactPoint() method with the public IP of the node in your deployment, shown as nodePubIp in your deployment Outputs tab.
2. Create a Session object.
Session session = cluster.connect();
- This is when the driver makes connections to the cluster nodes.
3. Execute statements using the Session object.
session.execute("CREATE KEYSPACE IF NOT EXISTS killrvideo WITH replication = {'class': 'SimpleStrategy', 'replication_factor': 1};");

session.execute("CREATE TABLE IF NOT EXISTS killrvideo.videos (name TEXT, description TEXT, PRIMARY KEY(name))");
session.execute("INSERT INTO killrvideo.videos (name, description) VALUES (?, ?);", "Avengers: Endgame", "No spoilers");
ResultSet rs = session.execute("SELECT * FROM killrvideo.videos WHERE name = ?;", "Avengers: Endgame");
for (Row row : rs) {

   System.out.println("Name:" + row.getString("name"));

   System.out.println("Description: " + row.getString("description"));

}
- The execute() method is used to run a CQL statement
- The first two statements creates our data model, which is a keyspace killrvideo, and a table videos. Normally you'll want to create the data model outside of the application, but we do it here to minimize the steps for this example.
- The third statement inserts a row into the newly created table
- The last statement runs a query, which returns a ResultSet object
- The ResultSet is an Iterable object and can be processed using a for-loop to iterate through each of the rows in the query results
The full code:
import com.datastax.driver.core.Cluster;

import com.datastax.driver.core.ResultSet;

import com.datastax.driver.core.Row;

import com.datastax.driver.core.Session;
public class Application {
   public static void main(String[] args) {

      Cluster cluster = Cluster.builder().addContactPoint("40.83.177.33").build();

      Session session = cluster.connect();
      session.execute("CREATE KEYSPACE IF NOT EXISTS killrvideo WITH replication = {'class': 'SimpleStrategy', 'replication_factor': 1};");

      session.execute("CREATE TABLE IF NOT EXISTS killrvideo.videos (name TEXT, description TEXT, PRIMARY KEY(name))");
      session.execute("INSERT INTO killrvideo.videos (name, description) VALUES (?, ?);", "Avengers: Endgame", "No spoilers"); ResultSet rs =

      session.execute("SELECT * FROM killrvideo.videos WHERE name = ?;", "Avengers: Endgame");
for (Row row : rs) {

         System.out.println("Name:" + row.getString("name"));

         System.out.println("Description: " + row.getString("description"));
} cluster.close();
}
}
4. Run the application
Next steps
We briefly went through the steps to build an app using DataStax Distribution of Apache Cassandra on Azure. If you'd like to learn more and watch a demonstration, please join us for our upcoming webinar, Getting Starting with DataStax Distribution of Apache Cassandra on Azure.
Finally, please be sure to refer to the comprehensive Documentation for any questions you may have about the architecture, procedures, and best practices.
More Company
View All
Shaping the Wild in Las Vegas: An AWS re:Invent Recap

Announcing 12 Days of Codemas: The DataStax Holiday Giveaway!

London Called. RAG++, The AI Event, Answered!