

Part 3 of this blog series will focus on how to do text analytics with DataStax Enterprise Analytics, Apache Cassandra™, Apache Spark™, PySpark, Python, and Jupyter Notebooks.
What Problem Are We Trying to Solve?
The question of our time: "What movie should I actually see?" Wouldn't it be great if you could ask 1 million people this question? Wouldn't it be great if I could automate this process? And wouldn't it be great if I actually understood how to do text analytics! Data analytics doesn't have to be complicated and neither does text analytics.
To do this we can use the power of a combination of technologies: DataStax Enterprise Analytics with Apache Spark™ MlLib, Apache Cassandra™, Python, PySpark, Twitter Tweets, Twitter Developer API, Jupyter notebooks, Pandas, and Pattern!
How Are We Going to Solve It?
In the Part 1 and Part 2 blog entries on this topic we installed DSE, Jupyter, got set up with the Twitter Dev API, and installed our Python packages. Now we are ready to walk through how to actually do the text analytics. We are going to use the Apache Spark™ MLlib functions Tokenizer, StopWordsRemover and do sentiment analysis with the Python package Pattern. Learn More About Pattern Here
Let's Walk Through the Notebook Cell by Cell
Notebooks can be found on GitHub here: SentimentAnalysisDSE
Also included in this link is a notebook "When Rotten Tomatoes isn’t Enough CSV.ipynb" and two csv files. If you are unable to create a Twitter Dev account, you can walk through the demo using real tweets about Mama Mia 2 that are included in the csv files.
Markdown only cells will be ignored here, but please read them as you walk through the example on your own.
Cell 1: When Rotten Tomatoes Isn't Enough: Twitter Sentiment Analysis with DSE
Cell 2: Things to Setup (more detail on this in Part 1 and Part 2 )
Cell 3 and 4: Adding some Environment Variables
pysparkzip = "
py4jzip = "
# Needed to be able to find pyspark libaries

import sys

sys.path.append(pysparkzip)

sys.path.append(py4jzip)
In order to use the correct DSE PySpark, these zip files will need to be added to the system path. This has been fixed in DataStax Enterprise 6.7, but if using an older version of DSE these will need to be added. The full path to these zip files will need to be found in advance and added here. More info on DSE 6.7
Cell 5: Importing Packages
import pandas

import cassandra

import pyspark

import tweepy import re

import os from IPython.display

import display, Markdown from pyspark.sql

import SparkSession from pyspark.ml.feature

import Tokenizer, RegexTokenizer, StopWordsRemover

from pyspark.sql.functions import col, udf

from pyspark.sql.types import IntegerType

from pattern.en import sentiment, positive
All the packages we will need are imported here. Packages of particular note for our text analytics are: pyspark.ml.feature Tokenizer, RegexTokenizer, StopWordsRemover and pattern.en sentiment, positive. The Cassandra Python driver is being utilized in this notebook and is imported by calling cassandra. The library called tweepy is a Python wrapper that will be used to make Twitter API calls, which makes it much easier to use than the standard REST calls. Note: If you get an error here and you feel confident you have installed all the packages correctly, try to run the cell again the error should go away.
Cell 6: Display Formatting Helper Function
#Helper for pretty formatting for Spark DataFrames

def showDF(df, limitRows = 5, truncate = True):

   if(truncate):

      pandas.set_option('display.max_colwidth', 50)

   else:

      pandas.set_option('display.max_colwidth', -1)      pandas.set_option('display.max_rows', limitRows) display(df.limit(limitRows).toPandas())

pandas.reset_option('display.max_rows')
This function helps limit the number of rows and columns displayed when a dataframe is printed to the screen.
Cell 7: Connect to DSE Analytics Cluster
from cassandra.cluster import Cluster cluster =
Cluster(['127.0.0.1']) #If you have a locally installed DSE cluster

session = cluster.connect()
Here is where the fun starts, by connecting to the DSE database. We import Cluster and then use that to connect to our cluster. In this case, we are using a local instance of DSE, so I used localhost for the IP address. Once we have a cluster instance we need to establish the connection and get a current session object. This session object will be what we use to run queries on DSE.
Cell 8: Create Demo Keyspace
session.execute("""

   CREATE KEYSPACE IF NOT EXISTS dseanalyticsdemo

   WITH REPLICATION =

   { 'class' : 'SimpleStrategy', 'replication_factor' : 1 }"""

)
The first query we will run is to create our keyspace. A keyspace is like a database in a relational database, and will hold our tables. We will create it only if it does not exist. We are going to use the replication strategy SimpleStrategy (since are just running a demo and only on one node) and a replication factor of 1. More About Replication Strategies Here The replication factor is the number of times our data will be replicated across our cluster of nodes. In this case we only have one node, since this is a local setup so we should only replicate our data once.
Cell 9: Set keyspace
session.set_keyspace('dseanalyticsdemo')
Setting the keyspace makes life simpler, and now every action we perform will be inside this keyspace. If you do not want to perform this step, just reference the keyspace before each table name, for example: "dseanlayticsdemo.table1".
Cell 10: Set Movie Title variable --Change this to search for different movies!
movieTitle = "spiderverse"

positiveNegative = ["pos", "sad"]
This cell is one of the most important, as this the cell we can edit to change the movie title we are searching for. You only need to change the movieTitle variable and everything else will be updated to reflect the change. In this case, I am going to be searching for "SpiderVerse", in the original notebook posted you will see "missionimpossible" in its place. We also create a list called positiveNegative, as we will be separating our data based on if it is positive or negative. More about this in a few more cells.
Cell 11: Create two tables in Apache Cassandra for the movie title
for emotion in positiveNegative:
   query = "CREATE TABLE IF NOT EXISTS movie_tweets2_%s_%s (twitterid bigint, tweet text, PRIMARY KEY (twitterid))" % (movieTitle, emotion)

   print query

   session.execute(query)
Two tables will be created (if they have not been created already). One for positive tweets and one for negative tweets. In this table we only have two columns: the twitterid and the tweet itself. In this case we will be using the twitterid as our primary key to distribute the data. We can see there might be problems with distributing the data this way as we will not be able to store multiple tweets from the same person (since they would have the same twitterid), but for the sake of the demo we will continue to model our data in this way.
Cell 12: Setting up Search Terms
searchTermSad = movieTitle + " :("

searchTermPos = movieTitle + " :)"
searchTerms = [searchTermSad, searchTermPos]
Here we are setting two variables for our Twitter API search terms. The Twitter API can do a first pass at sentiment analysis by using a happy face or a sad face with your search term. I have found that the positive search terms seems to work well, but the negative search term doesn’t seem to work as well. We are separating out the tweets we collect by this so that we can do further analysis. More on Twitter Search Operators Here
Cell 13: Function to Clean Up Each Tweet before if is inserted into DSE
#Code from: https://stackoverflow.com/questions/33404752/removing-emojis-from-a-string-in-python def cleanUpTweet(tweet):
emoji_pattern = re.compile(

u"(\ud83d[\ude00-\ude4f])|"

u"(\ud83c[\udf00-\uffff])|"

u"(\ud83d[\u0000-\uddff])|"

u"(\ud83d[\ude80-\udeff])|"

u"(\ud83c[\udde0-\uddff])"

"+", flags=re.UNICODE)
removeSpecial = re.compile ('[\n|#|@|!|.|?|,|\"]')

removeHttp = re.compile("http\S+ | https\S+")

removeRetweet = re.compile("RT")
noemoji = emoji_pattern.sub(r'', tweet)

nospecial = removeSpecial.sub(r'', noemoji)

nohttp = removeHttp.sub(r'', nospecial)

noretweet = removeRetweet.sub(r'', nohttp)
cleanTweet=noretweet
return cleanTweet
This function cleans up the tweets before they are inserted into DSE. Emojis (but as you will see below, a few slip by), special characters, any URLs, and "RT" (which means a tweet has been retweeted) will all be removed from the tweet and the cleaned up tweet will be returned to be inserted into DSE. This Code was Found Here
Cell 14: Required from Twitter Keys and Authorization
consumer_key = os.environ['CONSUMER_KEY']

consumer_secret = os.environ['CONSUMER_SECRET']
access_token = os.environ['ACCESS_TOKEN'] access_token_secret = os.environ['ACCESS_TOKEN_SECRET']
auth = tweepy.OAuthHandler(consumer_key, consumer_secret)

auth.set_access_token(access_token, access_token_secret)
api = tweepy.API(auth)
Each of these tokens and keys must be provided in order to access Twitter’s Dev API. These access keys will be granted when your application has been approved. I have added these to my .bash_profile in my environment, grab them from the environment, and use them to authenticate and get an api object. The api object will be used to search and pull the tweets directly from Twitter. If these have not been setup in your environment, you can copy the keys and tokens directly here, but be sure to practice safe security (anyone who gets all four of these has potential to hack your account!).
Cell 15: Pull Tweets from Twitter, Clean Up Tweets, Insert into DSE
for emotion in positiveNegative:

   print emotion

   public_tweets = 0

   query = "INSERT INTO movie_tweets2_%s_%s (twitterid, tweet)" % (movieTitle, emotion)

query = query + " VALUES (%s, %s)"
if emotion == "pos":

   searchTermPos= movieTitle + "%20%3A%29"

   public_tweets = api.search(q=searchTermPos, lang="en", count="100")

if emotion == "sad":

   searchTermSad= movieTitle + "%20%3A%28"

   public_tweets = api.search(q=searchTermSad, lang="en", count="100")
for tweet in public_tweets:

   cleanTweet = cleanUpTweet(tweet.text)

      session.execute(query, (tweet.id, cleanTweet))

      print(cleanTweet)
This cell will pull tweets from Twitter. The max number of tweets returned for free at one time is 100. Run this code a couple of times to get more data, but note that only 15 pulls are allowed per hour. A for loop surrounds this to make one call for positive tweets and one call for negative tweets. The INSERT query is constructed using the query variable. Using the Twitter API object search on the search term, this will return a list of SearchResult objects. This object has many different fields but in this case we will just be using the id and text fields. We will loop over this list of SearchResult objects, clean up the text of the tweet, and then use session.execute with the query we constructed above. The happy and sad face emoji have been encoded.
Cell 16: Verify with select *
for emotion in positiveNegative:

   print emotion

   query = 'SELECT * FROM movie_tweets2_%s_%s limit 10' % (movieTitle, emotion)

   rows = session.execute(query)

   for user_row in rows:

        print (user_row.twitterid, user_row.tweet)
pos

(1074789095216427009, u' shannondrewthis: I know I keep gushing about Spiderverse but please go see it if you can especially a lot of you adults out there D\u2026') (1074788925732864000, u' daianpan: SpiderVerse was such a fun movie heres some sketches of Miles')

)

sad

(1074788969286492160, u' HHFlashbacks: I treated myself to Spiderman: into the spiderverse and nobody stayed for the after credits')
Verify that the tweets were inserted into DSE by doing a select * on the positive and negative tables. Please note: In a production system this action (select * from table) would not be recommended, as it is a full table scan.
Cell 17: Create Spark Session and create DataFrames from DSE tables
countTokens = udf(lambda words: len(words), IntegerType())
spark = SparkSession.builder.appName('demo').master("local").getOrCreate()
tableNamePos = "movie_tweets2_%s_pos" % (movieTitle.lower())

tableNameSad = "movie_tweets2_%s_sad" % (movieTitle.lower()) /

tablepos = spark.read.format("org.apache.spark.sql.cassandra").options(table=tableNamePos, keyspace="dseanalyticsdemo").load()

tablesad = spark.read.format("org.apache.spark.sql.cassandra").options

(table=tableNameSad, keyspace="dseanalyticsdemo").load()
print "Positive Table Count: "

print tablepos.count()

print "Negative Table Count: "

print tablesad.count()
Positive Table Count:

100

Negative Table Count:

100
In this step we create a Spark session, and from there we load each table containing Twitter data into a Spark Dataframe and take a count of the number of rows in each. As PySpark has lazy execution, we want to perform an action, such as count, right away to make sure there are no issues loading the data from DSE table to PySpark Dataframes. Here we can see we have 100 rows in each of our tables.
Cell 18: Use Tokenizer to break up the sentences into individual words
tokenizerPos = Tokenizer(inputCol="tweet", outputCol="tweetwords")

tokenizedPos = tokenizerPos.transform(tablepos)
dfPos = tokenizedPos.select("tweet", "tweetwords").withColumn("tokens", countTokens(col("tweetwords")))
showDF(dfPos)
tokenizerSad = Tokenizer(inputCol="tweet", outputCol="tweetwords")

tokenizedSad = tokenizerSad.transform(tablesad)
dfSad = tokenizedSad.select("tweet", "tweetwords").withColumn("tokens", countTokens(col("tweetwords")))


showDF(dfSad)

Now we use Tokenizer to break up the sentences into individual words. The Pattern sentiment analysis library performs analysis on individual words rather than phrases or sentences. More on Apache Spark Tokenizer Here
Cell 19: Use StopWordsRemover to remove all stop words
removerPos = StopWordsRemover(inputCol="tweetwords", outputCol="tweetnostopwords") removedPos = removerPos.transform(dfPos)
dfPosStop = removedPos.select("tweet", "tweetwords", "tweetnostopwords").withColumn("tokens", countTokens(col("tweetwords"))).withColumn("notokens", countTokens(col("tweetnostopwords")))
showDF(dfPosStop)
removerSad = StopWordsRemover(inputCol="tweetwords", outputCol="tweetnostopwords") removedSad = removerSad.transform(dfSad)
dfSadStop = removedSad.select("tweet", "tweetwords", "tweetnostopwords").withColumn("tokens", countTokens(col("tweetwords"))).withColumn("notokens", countTokens(col("tweetnostopwords")))
showDF(dfSadStop)
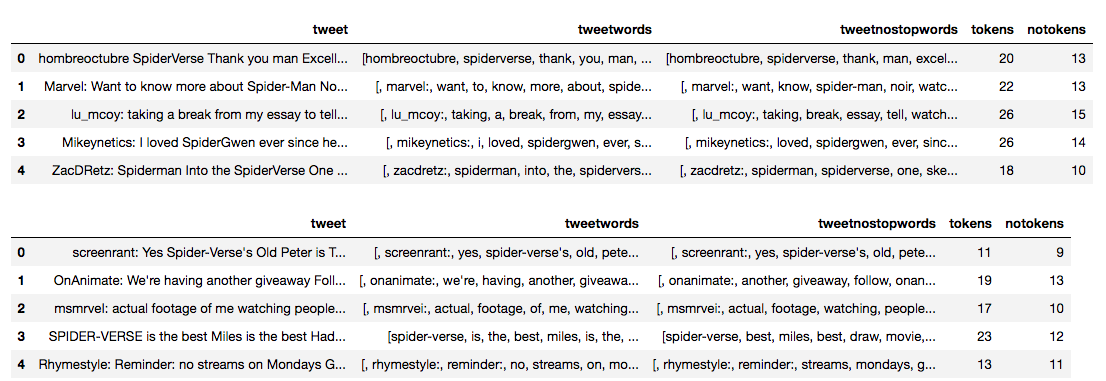
Now we use StopWordsRemover to remove all stop words. Stop words are all the filler words we use to make our sentences grammatically correct but add little to no meaning to the intent of our words. Interesting to see, people don't use many stop words with Twitter! More on Apache Spark StopWordRemover Here
Cell 20 and 21: Sentiment Analysis using Python package Pattern
pandaPos = dfPosStop.toPandas()

movieScore = 0

countPos = 0

poslist = list()
for index, row in pandaPos.iterrows():

   if not positive(row["tweetnostopwords"]) and sentiment(row["tweetnostopwords"])[0] != 0.0:

      countPos = countPos + 1

   score = sentiment(row['tweetnostopwords'])[0]

   if score > 0:

      poslist.append((row['tweet'], sentiment(row["tweetnostopwords"]), positive(row["tweetnostopwords"]), \

        sentiment(row['tweetnostopwords']).assessments))

      movieScore = score + movieScore
labels = ['Original Tweet', 'Sentiment Score', 'Positive', 'Assessments']
positiveTweetScores = pandas.DataFrame.from_records(poslist, columns=labels) positiveTweetScores
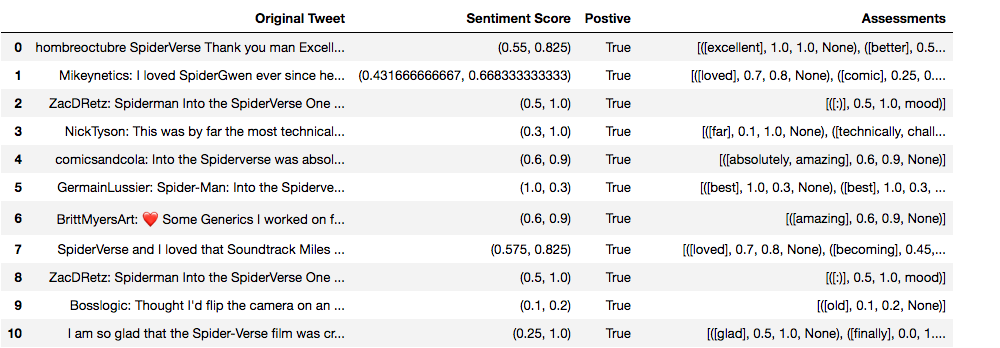
Next we convert each Spark Dataframe to a Pandas Dataframe. This works as-is because we are working with a small dataset. For larger datasets we would only convert to Pandas if the data can fit in memory. From there, we loop over each row and get the sentiment score (anything + is positive sentiment and anything - is negative sentiment). The positive function will return true if the tweet is positive. The assessments function shows which words where used to judge and the score of each word. The most interesting information will come out of the assessment. You might find here that you need to remove more custom stop words as they might be hurting your assessment. In this case we can see strong positive scores for words like excellent, love, best, glad. More info on how the scores are calculated here. To be able to get an average of the sentiment scores, each sentiment score for each category (positive or negative) is added together.
Cell 22: Alright! Should I see this movie???
posrating = movieScore/(dfPos.count() - countPos)
display(Markdown('**{}** \n{}'.format("Positive Rating Average Score", posrating)))
if dfSad.count() != 0:

   sadrating = movieScoreSad/(dfSad.count() - countSad) else:

   sadrating = 0
display(Markdown('**{}** \n{}'.format("Negative Rating Average Score", sadrating)))
if posrating > abs(sadrating):

   print "People like this movie!"

   display(Markdown('**{}** \n'.format("People Like This Movie!")))

elif posrating == abs(sadrating):

   display(Markdown('**{}** \n'.format("People are split! Take a chance!")))

elif posrating < abs(sadrating):

   display(Markdown('***{}*** \n'.format("People Do Not Like This Movie!")))
Positive Rating Average Score

0.27406448203
Negative Rating Average Score

-0.150137362637
People Like This Movie!
To make the final determination if you should see this movie, we average the positive sentiment scores and the negative sentiment scores. If the positive score is greater than the negative, we recommend you should go see the movie and that people like this movie. In this case, SpiderVerse has a greater positve rating score and we are recommending that you go check it out. Is this what you expected? Did you check out Rotten Tomatoes beforehand, does our assessment line up? If it doesn't, that's okay. Data Science and Data Analytics is a true science. It's all about discovery and exploration. Science is an iterative process!
I have enjoyed working on, presenting, and writing up this demo. If you would like to see more about DataStax Analytics and Apache Spark MlLib in the future, please comment below.
What Problem Are We Trying to Solve?
How Are We Going to Solve It?
Let's Walk Through the Notebook Cell by Cell
Cell 1: When Rotten Tomatoes Isn't Enough: Twitter Sentiment Analysis with DSE
Cell 2: Things to Setup (more detail on this in Part 1 and Part 2 )
Cell 3 and 4: Adding some Environment Variables
Cell 5: Importing Packages
Cell 6: Display Formatting Helper Function
Cell 7: Connect to DSE Analytics Cluster
Cell 8: Create Demo Keyspace
Cell 9: Set keyspace
Cell 10: Set Movie Title variable --Change this to search for different movies!
Cell 11: Create two tables in Apache Cassandra for the movie title
Cell 12: Setting up Search Terms
Cell 13: Function to Clean Up Each Tweet before if is inserted into DSE
Cell 14: Required from Twitter Keys and Authorization
Cell 15: Pull Tweets from Twitter, Clean Up Tweets, Insert into DSE
Cell 16: Verify with select *
Cell 17: Create Spark Session and create DataFrames from DSE tables
Cell 18: Use Tokenizer to break up the sentences into individual words
Cell 19: Use StopWordsRemover to remove all stop words
Cell 20 and 21: Sentiment Analysis using Python package Pattern
Cell 22: Alright! Should I see this movie???
More Technology
View All

Build Powerful Multi-Agents with Langflow 1.1

Langflow Reimagined: Streamlined for Even More Productivity