
Warning: The procedure described in this post of upgrading an existing cluster to vnodes by leveraging shuffle is no longer advised. Using the shuffle utility on a running production system may result in performance degradation and potential downtime. Bootstrapping a new data center is a much safer way to enable vnodes. Use the procedure described in Enabling virtual nodes on an existing production cluster instead.
You may already be aware that vnodes are coming in Cassandra 1.2. But how does one shift their existing single token per node architecture to vnodes without any downtime? Fear not, as previously promised, I will cover the upgrade procedure in this post.
The first step is similar to what I mentioned in my last post with regard to enabling vnodes; you set the num_tokens parameter in your yaml config, and restart the node (recall that 256 is a good starting point for this parameter.) When this happens, the node will sleep for RING_DELAY to make sure its view of the ring is accurate, and then split its current range into the number of tokens you specified. Will that break or change anything? No, because while the range is split into many tokens, the range remains *contiguous*, making it equivalent to what it was before, but now with more tokens. This means you're technically using vnodes, but don't actually have any of the benefits yet.

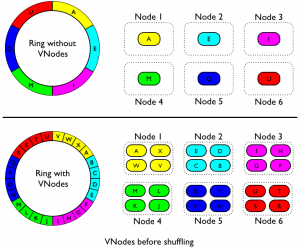
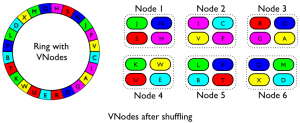
To realize the benefit of vnodes, we need to randomly redistribute the vnodes amongst the cluster. Cassandra 1.2 has a utility designed for this, called 'cassandra-shuffle'. Shuffle will be a two phase operation: first, it will schedule range transfers, and finally it will execute them. Once shuffle has scheduled the range transfers, the nodes will begin transferring their scheduled ranges to adhere to what shuffle decided, in a vein similar to the classic 'nodetool move' has done in the past. This will effectively split up all the contiguous ranges each node had and randomize them, as if your cluster had started with vnodes from the beginning. To begin the shuffle process first run 'shuffle create' to create the schedule, and then 'shuffle enable' to actually begin the transfers. You can run 'shuffle ls' to see what transfers remain at any point.

This upgrade procedure may seem a bit worrisome; that's understandable. However shuffle can be done on a per-datacenter basis, so if you're afraid you can test it on your QA or analytics DC first before proceeding with the other, more important datacenters. You can also mix vnode-enabled and non-vnode datacenters in this way, run shuffle without any arguments to see all the available options.
Workflow Changes
In the past, you've probably become at least somewhat familiar with Cassandra's nodetool command. In particular, nodetool ring is often the 'go to' command to see the state of the cluster. In a vnode-enabled cluster you can still do this, but it will be extremely noisy because it will print every vnode that each node has, and this can be overwhelming. Instead, there's a new nodetool command called 'status' which will be your new bread and butter command that replaces 'ring'. Here is some sample output from nodetool status:
- 1
- 2
- 3
- 4
- 5
- 6
- 7
- 8
Datacenter: datacenter1
=======================
Status=Up/Down
|/ State=Normal/Leaving/Joining/Moving
--  Address           Load       Tokens  Owns    Host ID                               Rack
UN  10.179.65.102     197.96 MB  256     32.3%   6ac56251-08ff-46be-be06-5b8dd929b937  rack1
UN  10.179.111.137    209.3 MB   256     34.1%   aade8ef6-c907-427c-87be-a5fe05a27fa4  rack1
UN  10.179.64.227     205.86 MB  256     33.6%   4634cc80-0832-4ea1-b4a6-39ae54985206  rack1
Other changes in your workflow with vnodes will include topology changes, specifically node removal. There's no longer a need for the 'move' command to balance your ring so it is disabled once vnodes are enabled, but there is still a need to remove nodes sometimes. In the past, this has been done via decommission for live, but unwanted, nodes. This procedure remains the same, however the procedure for removing a dead node is slightly different. Dead nodes were previously removed in a non-vnode cluster with removetoken, which takes the token you'd like to remove as a parameter. Obviously, with vnodes it would be extremely tedious and possibly error-prone to list all the tokens as parameters, so instead removetoken is now gone and instead you should use removehost. This command is extremely similar to removetoken, except instead of passing a token to it, you need to pass a host id, which is the UUID seen in the previous output from status.
Finally, one thing you may notice (and is apparent in the sample output) is that the 'owns' percentage is no longer picture perfect, there's a small bit of variance. This is perfectly normal and expected with vnodes, since balancing them with absolute precision is nearly impossible. This isn't a problem in practice, however, since the amount is small and variance in your row sizes are likely already causing the same amount of imbalance in your cluster already. Which is to say that the picture perfect you had before wasn't really perfect either, so this shouldn't worry you.
I've covered the benefits of using vnodes previously. Hopefully now you have a clear view of how to begin using them in your existing cluster when Cassandra 1.2 is released, and can begin to reap all of its rewards.